


Lee Smith
-
Posts
94 -
Joined
-
Last visited
Content Type
Forums
Downloads
Articles
Gallery
Blogs
Events
Store
Posts posted by Lee Smith
-
-
Sign me up.
Thank you very much,
Lee Smith
-
My manual does not list a cap.
My local NAPA cannot find one.
I was able to verify on the verulinks website that the 16 psi motorad is listed for the 2004 Signature. I am now comfortable with the 16 psi cap. Maybe the F3 was a substitute somewhere along the line. I do hope someone with a series 60 diesel can give me a final verification.
-
I noticed that my 2004 Signature radiator cap is in need of replacement.
I called REV Parts which has the ability to look up older parts. I got transferred to their Washington State office and placed an order for the part they looked up. It turns out that they do not have parts diagrams but work off a photo system. Interesting but apparently works.They sent me a Motorad 16 psi cap. The existing one on my radiator/coolant recovery tank has a "F3" stamp on it. According to my research, the "F3" cap is only 4 psi.
I have heard mechanical cautions that it is very important to use the correct psi cap.
If you have a Signature with a Detroit 60 engine, please look at your cap and let me know what is stamped on the cap.
As a note, it does appear that this may be called a "coolant recovery cap" but the Signature with a Detroit 60 engine has a pressurized aluminum tank for the radiator fluid.
Below are pictures of the Motorad 16 psi cap and the F3 4 psi cap.


Thank you very much for your help.
Lee Smith
-
45 minutes ago, Lee Smith said:
So that is just a plug. Should turn it counterclockwise?
Do I leave it removed and then hook the quick connector up?
I was thinking it was just a plug, but I am always afraid of breaking something and it comes out hard. I will likely need to put a wrench on the backside to keep the whole valve from turning.
The amount of thread for the quick connector looks slim. I think I can adjust it for more thread.
Thank you again.
Okay, I get it now. I did my research. It is just a brass plug to seal off the end of the unused air-line. Due to the fact that there is a plastic line connected to the brass 90 I cannot heat it. I will soak it with Kroil oil and try to remove it tomorrow. I will adjust the fitting for more thread for the quick connect I will add.
Thanks everyone.
-
8 minutes ago, Ivan K said:
Remove just the brass plug with a hex tool.
So that is just a plug. Should turn it counterclockwise?
Do I leave it removed and then hook the quick connector up?
I was thinking it was just a plug, but I am always afraid of breaking something and it comes out hard. I will likely need to put a wrench on the backside to keep the whole valve from turning.
The amount of thread for the quick connector looks slim. I think I can adjust it for more thread.
Thank you again.
-
41 minutes ago, K9 Exec said:
Hi Lee,
The best and most accurate way to test that port, is with a gauge that accepts up to 150 psi. I do not have one laying around any longer, but you could source it online for sure. You will have to adapt it most likely, from 1/4 to 3/8 or whatever the gauge you get terminates to.
Once you do have it connected, air your tanks up, release your airbrake then have your helper hit your service brake pedal while you are looking at it, and you should see how many PSI you are getting at that location.
Another option is to remove the plug, have a helper hit the brake with you back there, and the air should flow.
Best of luck,
Nick
Just to prove that I have never worked on an air brake system: How do I remove the plug?
When you look straight into the connection, there is a hex connection. Does that remove? Or are you talking about removing the whole connector?
Thank you,
Lee
-
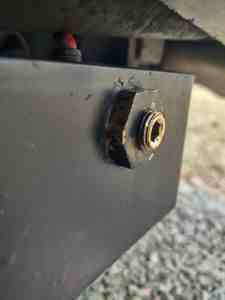
My coach has a factory supplied air brake connector at the rear (next to toad towbar connection).
How do I test this connector for air flow?
Here are pictures:

Thank you,
Lee Smith
-
David,
I can't thank you enough for this help and all you do for this wonderful forum. What could have been a very hard time for me as I start my retirement at 70 has turned into an extremely interesting full time hobby.
Of course the time comes slow the hobby down and enjoy my very special Signature. See you in Tampa.
-
55 minutes ago, 96 EVO said:
I've often wondered what happened to Mike?
He was a moderator, and frequent poster over there, and seemed to just disappear 🤔!
I have heard that statement before on our forum.
I hope he is okay.
-
I purchased a 2004 Signature Conquest with the Detroit 60 last April.
I ran across 4,600 posts by "Mike Canter" on the IRV2 Monaco Owner's forum section.
Mike owns a 2004 Signature Conquest with the Detroit 60.
He has done a lot of posts regarding the radiator tank coolant sensor leaking and wicking down inside the harness into the ECU unit. His ECU was ruined by this.He posted a picture of the brass sending unit that he used to replace the OEM plastic sending unit. See link below:
2004 Monaco Signature Jake Brake and Cruise Control Failure - Page 3 - iRV2 Forums
My 2004 Signature Conquest has the same radiator, but the sending unit is on the front and looks to be plastic.
My guess is that I should replace it with the brass sending unit as suggested by Mike. It certainly is a lot less expensive than replacing the ECU. See below for a picture of my sending unit and a link to the replacement part recommended by Mike (I located it on eBay):
NEW NOS OEM Detroit Diesel Coolant Sensor 1/4" NPT P/N 23520380 Free Ship | eBay
1. Has anyone had the problem that Mike has described?
2. If so, what were the symptoms?
3. How did you fix the problem?
My thanks to everyone in advance for your help.
This is absolutely the best forum I have ever belonged to.
I need all the help I can get, and I appreciate the advice very much.
Happy New Year to All,
Lee Smith
-
Try this link:
I think you will need to open an account.
As to your list, it is best if you have the Cummins Part Number as their website is not very helpful.
Good Luck,
Lee
-
I just got an email for a Cummins cyber-Monday sale-today only:

-
We are hoping to do so no later than next year.
A lot of people like Florida and prices are up.
I am sure we will find a way to manage.
Going full time while looking for budget matching deals is clearly in the picture. -
That is a great idea for empty water bottles.
Here in Virginia, we are scheduled for a week of long nighttime temps in the low 20's and not very high daytime.
And I park outside. -
I wanted to share my first-time experience winterizing my new (new to me) 2004 Signature Conquest. I tend to thoroughly research everything and could not do so without this forum. I want to express my sincere appreciation to the founders, administrators and members for making this all possible.
My findings are as follows:-
Based on my research, I choose to use propylene glycol-based RV antifreeze instead of the more common and cheaper ethanol-based RV antifreeze:
- Ethanol mixed or pure is flammable and may harm the plumbing faucet rubber seals.
- Advertisements for RV antifreeze are misleading. Most contain a mixture of ethanol and glycol which many times is only specified as a potential range by percent of each.
- I responded to a NAPA propylene glycol internet search and went to pick it up. Much to my dismay I read the lable and found it to be a mixture with ethanol. It was pink. Fortunately, the store had a small stock of propylene glycol-based RV antifreeze from a prior customer special order. It was blue.
- Based on my in-store experience, I went online and found this specification for the offered propylene glycol (see this link): -100 WinterSafe RV Anti-Freeze - Non-Toxic PG (starbrite.com).
- Ethanol-based RV antifreeze looks like me to be always pink in color and sells for around $4 to $10.
- Propylene glycol RV antifreeze looks like me to be always blue in color and sells for around $33 to +++.
- It is pricy but I found it at Napa online for 20% off (quantity discount) and free ship to home (see this link): Antifreeze / RV Recreational Vehicle StarBrite 1 GAL NCB 31500 | Buy Online - NAPA Auto Parts (napaonline.com) . There are probably other places to buy but this is what I settled on.
- I hope to be able to recover and re-use my expensive propylene glycol RV anti-freeze.
-
Here is a picture of the propylene glycol I used:

-
I looked at a lot of systems that were advertised to make the introduction of the RV anti-freeze easier. It turned out that a simple city water supply hose attachment to use 40 psi air pressure to remove the water remaining after a tank drain and the attachment of a short extension to the freshwater tube feeding the water pump in my Aqua-Hot bay was the easiest to use, fast and also the most economical. I used 1/2" ID poly tube from ACE Hardware and bought small hose clamps to match. I removed my filters but chose not to bypass due to expense and space requirements. This method uses a little more glycol but looks least likely to introduce leaks. And was also based on my neophyte plumbing experience. Plus, no RV anti-freeze had to be put in the water tank. Also, the air blow-out let me use less RV anti-freeze. I used 7 gallons including the washer/dryer combo and tank back-flush system. I just followed the directions for each in my coach manual.
-
Here is a picture of my water pump connections:

-
Here is a picture of my water pump connections:
-
Based on my research, I choose to use propylene glycol-based RV antifreeze instead of the more common and cheaper ethanol-based RV antifreeze:
-
20 minutes ago, Gary Cole said:
Not sure what to think about all of your new o-rings leaking to that extent Lee. They typically work very well. Have had an rare occasional failure over many years. Always my fault. If they all leak then I would take a second look at the o-rings as Tim suggested. Maybe try another supplier. The o-rings do require being squeezed between the 2 clamping faces surfaces in order to provide the necessary compression force on the tube. However that small clamping force is limited by the design of the fitting. I don't have one in front of me however I believe the assembly is a type that bottoms out mechanically in order to limit the force on the o-ring so that the o-ring can flow from high to low pressure and provide a seal. Which is how o-rings work. The moderate torque on the nut is largely to prevent it from backing off.
A/C FITTING TORQUE GUIDE The following is a general list of recommended torque values for standard O-ring fittings for reference during service operations. Always use specific torque values on installation instructions over these general values. HOSE FITTING CONNECTIONS -- RECOMMENDED TORQUE VALUE: Fitting Size* Thread Size Torque Value (ft/lbs) # 6 5/8-18 11 to 13 # 8 3/4 - 16 or 18 15 to 18 #10 7/8 - 14 or 18 18 to 22 #12 11/16 - 14 or 16 24 to 28 COMPRESSOR FITTINGS AND SERVICE VALVES Type Thread Size Torque Value (ft/lbs) 3-Way Service Valve to Compressor Fitting 1-14 20-40 Compressor: Sanden, Seltec, Zexel 3/4-16 18-22 7/8-14 18-22
My thanks to all three members that responded. I think my problem is the connections are not tight enough, but I am seriously cautious of damaging the connection.
Here is a typical picture of the connection:

I need to locate a torque wrench for the above fitting. How do you determine the fitting size? Does a #8 fitting use a #8 O-ring?
Do you think that a 1/16 turn on the wrench may fix the very minor leak or is the torque wrench the only way to go?
My thanks to all for the excellent help.
Lee Smith
-
 1
1
-
 1
1
-
-
On 8/19/2022 at 7:59 PM, Lee Smith said:
My dash AC is now fixed and working fine. I replaced the dryer/filter and the compressor. While I had the compressor off, I replaced the tensioner pully and added a new belt.
First, I drained the new compressor of its preloaded oil and then added 6 oz PAG 100 back in accordance with the Sanden compressor manual instructions. Second, I installed the new compressor. Third, I vacuumed the system for two hours. Finally, I started the engine, turned on the AC and charged the system with 60 oz of R134A.
It seems like someone had previously removed the compressor low and high side hoses but neglected to put the correct seals back on and also over tightened so much they were completely flattened. One of the seals was normal black rubber instead of the green type as required for R134A. There were major signs of compressor oil leakage right at the connection points. The old compressor had no oil at all. There were also bad seals at the front of the RV where the dryer filter was. The new filter/dryer came with new seals.
I could not have done this work without all of the great advice from everyone on the forum.
Thank you very much.Here are a couple of pictures at the engine for the new compressor and the new tensioner pully:


Unfortunately, the bigger problem is the need for a larger garage:

I will be working on this at my first opportunity. However, I will need to move the RV so my wife can use the garage again.
In closing, I wish to again express my great appreciation for this forum.
Bill D's Monacoers is the best.
Update: Two weeks after I completed the above work, all of the R134a had leaked. Things worked great for several days but went downhill after that.
I was guessing that the expansion valve O-ring was dried out from years of not running the ac, so I replaced the expansion valve today. I obtained a tank of nitrogen and a set of gauges. I charged the system to 100 psi. Slow leak down to 80 psi in several hours. I recharged and used Big Blu to check for leaks. No leaks detected but fittings are hard to see. I then discharged the nitrogen and ran a vacuum for 1 hour. Vacuum then held for another hour so I added 60 oz of R134a. I used an electronic leak detector to check on leaks. I found that nearly every AC hose connection that included an O-ring was leaking. I used the following procedure on each connection:
1. Cleaned each connection using a solvent.
2. Installed the correct size green O-rings and coated everything with PAG 100 oil before connecting back up.
3. I then hand tightened and then a very slight snug with a wrench.
I admit to not being very good at these types of connections. I need some help with technical details on how to connect the ac hose connections to all of the various components as it appears that all of my connections that involve an O-ring are slightly leaking. The system appears to be working correctly but I am guessing I will be out of R134a in about two weeks.
Here are two pictures of the installed expansion valve. I do not have pictures of the connections prior to installation, but I am sure most of you are familiar with the types of connections for these expansion valves.


Thanks in advance for your help.
Lee Smith -
Fox News website has a decent article on the East Coast diesel supply problem:
The article, in my opinion, is summed up as follows:
"Retail consumers shouldn’t expect to see widespread fuel stations with bags over the pumps," the company said. "It may happen on a rare occasion (and when it does, you’ll be sure to hear it in the news), but in general retail stations will find supply and stay running. Higher prices will simply get passed on to consumers."
In my book, this directly meets the old saying that "I have good news and bad news".
-
1
-
-
4 hours ago, throgmartin said:
Carey:
I have seen many arguments over when to extend the slides. Here is the correct way and as described by my buddy who was in charge of the body department at the Monaco factory.
As soon as you are parked and plugged in, extend the slides. Do NOT dump the air. Always extend your slides with the coach fully aired up and at ride height. Why ? Because the slides were adjusted and set at the factory with your coach at ride height. Dumping the air, leveling and then putting out the slides can bind areas of the slide. The slides always work best if the coach is fully aired up and at ride height. When ready to leave, fire up your coach, let it get to ride height and then bring in the slides.
As I stated above, with a 3 jack system always deploy the front jack first. This gives the house a pivot point when you start leveling side to side. If leveling manually, always go in small increments. Do not get aggressive and start jacking the heck of the corners. I always instruct customers who have an auto/manual jack system to over ride the auto and then level manually. I have seen the auto feature get overly aggressive while leveling so I am not a big fan of auto leveling when you have the manual option.
Hope this helps.
I have a 2004 Signature that I bought last April. When I follow this advice and open the slides at "ride height", I can clearly hear the operational sound difference when compared to opening the slides after running the air level system. I used a rubber seal conditioner on my slide seals and that also made a big difference. I am in construction and have a structural engineering design background and the ride height explanation sounds very reasonable to me.
-
2
-
-
3 hours ago, Ivan K said:
Polarity of an AC capacitor? Or flipping the start winding? Either way, the AC motor certainly makes it more complicated for an RV use than needed to be.
Ivan, that is a great opinion.
After three days trying to solve my overkill fold down TV, I am ready to keep the mechanical side but switch the electrical motor and wiring system to DC. I will try one more solution this morning and if this does not work I will make the switch to DC.
In that regard, I found what appears to be a well-made "do it yourself" fold down DC design online:Motorized Flip Down TV Lift : 7 Steps (with Pictures) - Instructables
Here is the design schematic and a sample wiring picture:


I do not believe that this will be complicated or expensive. I intend to fully re-use the mechanical lift components so the end product will look the same. There is already DC power to the unit for the control board and the stop limit switches that is fused in the front run box. There is also 110 AC, but I will probably run an extension cord back to the original console location above the passenger seat. One thing I will do, as suggested in this DIY writeup, is to add two direct DC wired accessible wire connection posts in order to be able to raise the unit in an emergency situation. I would hate to have this unit stuck down while trying to leave an RV park.
I will keep track and do a post on the results.
However, it may be several weeks to get ready and order parts.
In the meantime, I will remove the AC motor and temporarily raise the TV.-
1
-
-
3 hours ago, bpperk said:
I’m trying to track down my previously owned coach. When did you purchase your signature?
March 2022. Bought from the 2nd Owner in Canada. 1st owner was from Tennessee.
3 hours ago, Gary Cole said:Lee I would hardwire without question. I wouldn't waste anytime with unsupported, always obscenely overpriced, components. Two momentary pushbutton switches in order to reverse the motor. Or a 2 throw switch if you preferred. Forget about the limit switches as they are most certainly 1P and could not be wired in a 3 way configuration without using latching relays. Small dc motors are very tolerant of stalled rotor conditions. If you are concerned about the gear mechanism then experiment with an inline fuse that blows at some small amount of current above normal load in case you go to sleep on the push button. An automatically resetting dc breaker would be even more convenient. Very inexpensive.
Thanks for the advice.
The motor is 115v 2.7A 1/4 hp ac. It has an ac capacitor. The capacitor is wired directly into the controller circuit board. How can I wire it directly? Here is a picture of the capacitor:
-
Sorry to be ignorant but what is a PCB trace?
I can easily remove the control board as I have already removed and opened the control board aluminum box enclosure.
Do you have any ideas on how to find an electronics hobbyist?
Thank you for your help.
-
I just replaced my front TV with a 50" flat screen Samsung.
When I went to plug the TV into the lift controller box, I accidentally sparked the low voltage connector on the side of the controller.
Here is a picture of the connector:
Now my fold up/down electric lift is stuck down.
I went to great lengths to remove the control board to find out who made it. Here is a picture:

I found information on Tri Metal Fabrication, Inc but they are long out of business and the phone numbers and emails do not work.
The former President was Mike McCormick in Eugene, Oregon.
Does anyone have an electrical diagram for the Tri Metal Fabrication fold down lift?
Or a parts source?
I was able to verify that there is 110v power to the control board and the start capacitor tested good.
Also, the various green control lights on the controller appear to be all lit.There are two limit switches. when pushed down, the switch on the right will cause a red light to come on at the controller and will test 28 volts at the connector. When pushed down, the one on the left does not turn a red light on but will test 28 volts at the connector, Here is a picture:

Unless I can find a way to trouble shoot and fix, I am thinking I will straight wire and bypass the control board. I can fish an extension cord to the TV cabinet over the passenger seat for TV power. Of course, the motor could be bad. I should be able to straight wire the motor to test it without removing it.I can add a two-way momentary switch for up and down that works by reversing the polarity which changes the motor direction.
I have tried to be clear but as you may have noted, this is all very new to me.
Thanks in advance for any help you can give.
Lee Smith
-
Coach Glass handled the replacement for my 2004 Signature Conquest windshield. Progressive was great. However, Progressive farms out their RV windshield claim process to subcontractors who will try to steer you away from Coach Glass. Coach Glass made my original windshield, so I ignored all attempts to change my request for Coach Glass. Just as a side note, Coach Glass now occupies the original Monaco factory manufacturing location in Cogburn, Oregon. Then coach glass complicated things by telling me they had a three-month installation backlog. It turned out that the backlog was only for their in-house installation shops. They only have two shops. Coach Glass then they told me that they had a list of approved installers but was having a hard time finding one in my area that did not have a substantial backlog to do the work. I asked for the list of approved RV installers, and I vetted the list by checking references and reviews until I selected an installer. Next, things came to a halt while the Progressive subcontracted claims administrator rejected the selected installer's cost to install. Coach Glass then had to negotiate with the installer to get an agreeable installation cost. Once everything was approved, they needed to ship the glass to the installer. Fortunately, the OEM windshield was in stock at one of Coach Glass's several inventory shipping locations and the glass arrived a week later to the installer's shop. I quickly developed a personal relationship with the installer and was able to closely monitor the two-day installation process. The installer clearly had a lot of big glass RV experience and did a great job. The whole process took over five weeks. After all of the bad reports I have heard on big windshield glass RV replacement problems I was more than agreeable to get it done with the OEM Coach Glass replacement and the Progressive zero deductible claim.
Of course, my favorite hobby is vintage Honda and Yamaha motorcycle restoration, and I am used to the wait to get good old fashioned OEM work done. I owned several of these bikes in my youth and I feel young again by restoring the same model bikes I owned back in the day. Naturally, that was my previous hobby as my Monaco Signature is now my new hobby!
I wish you good luck in your replacement.


1998 Signature - main door lock malfunctioned, locked out.
in Body, Awning, Roof, Slides, & Steps
Posted
I got locked out of my 2004 signature.
I was stuck at a rest stop in Oregon on my way to Virginia.
I called a locksmith who drilled out the center rivet and removed the whole lock attachment mechanism.
He showed me how to use a pair of pliers to turn the lock open. It had nothing to do with the deadbolt.
I used a small pair of vice grips until I got home and bought a replacement TriMark lock on eBay.
When I removed the inner door panel to install the new lock, I found that a clip had come off to cause the problem.
It has been suggested that I should drill a hole opposite the emergency exit window lever so that I can use a small rod from the outside in the case that I have another lock failure.
I do hope some of this information helps.