


guy_ethier
-
Posts
27 -
Joined
-
Last visited
Content Type
Forums
Downloads
Articles
Gallery
Blogs
Events
Store
Everything posted by guy_ethier
-
Replacement of 2006 Endeavor Shower Skylight
guy_ethier replied to guy_ethier's topic in Body, Awning, Roof, Slides, & Steps
I was of the feeling that this was the only sealant one should use, based upon the manufacturer's recommendation? Amazon.com: SUREBOND BriRus SB140 Skylight Sealant (SB-140 T White) : Industrial & Scientific Anything else and one is looking for problems down the road. Am I wrong as I have checked the manufacturer's online videos and all of them say the same thing? Only use skylight sealant approved for skylights. -
While, after fixing both furnaces, the water heater and installing a new kitchen sink faucet where no full size man out to be able to fit into under the sink, I decided to clean my roof the other day. I then noticed a large crack in the dark colored shower skylight. Measurements, as close as I can tell with all of the extra goop covering everything in sight, comes out to be about 27" x 27" x 8" x 25" x 8" for the bubble portion. I assume there is a 2" nail flange around the side? The goop is at least 3 inches wide so hard to tell. I have sourced 2 outfits that sell them, but I was wondering if anyone, Scotty Hutto perhaps, has already replaced theirs and could second my measurements as being correct? I would like to order the new one prior to removing the old one and leaving such a large hole in the roof outside where I park the beast. I do know that there is a special sealant required as well as ordering extra stainless steel screws as the holes will not match and I might need extra screws. Not planning on using the original screws, but just want to be sure I don't run out. Finally, any benefit to smoked glass colored over white colored over clear colored other than white being harder to keep clean? Thanks,
-
Well, on to another headache and PIA with my 8531-IV-DCLP furnace. Decided to remove it to try to fix it once and for all as the outer exhaust tube is rusted tighter than you know what to the inner tube coming from the heat exchanger. This tube is supposed to just slide out, but when I removed the other one from the other side of the coach, it took me a couple of weeks as well (working with Blaster and time) only to find that a build up of rust inside was the culprit. This furnace is much harder to work on than that furnace was. Been using PB Blaster for several days, my propane torch, several large wrenches and hammers, and a gear chain wrench all to no avail. Is there a better way to remove this stuck on rusted in place PIA outer exhaust tube? I even removed the heat exchanger from the furnace frame to get at it better, but it still is not budging. In the second picture you will see what the problem is why the furnace was not working. About 1/2 cup of rusted heat element and a rusted heat element. Am replacing that plus getting a new electrode unit as we speak and although I can probably still put everything back together without removing the exhaust tube, it would be nice to be able to in order to check on the electrode and heat element in the future without having to rip out the furnace every time!


-
So, no need to remove the shiny push cap retaining ring on the outside threaded shaft? That would be a relief. I am afraid of going too Rambo on it and damaging either the fiberglass or the arm assembly. Thanks for the advice...will try it out tomorrow
-
The slender metal shield covering the snap ring behind it is proving difficult to remove. Used PB Blaster rust remover and my heat gun several times and still she won't budge. Will repeat this every day 😵💫all this week until one of us gives up! You stated that it was all one piece and not two? Hmmmm...mebbe I am missing something here? It looks like 2 pieces and not one. And to remove the snap ring I have to remove the shiny shield?
-
Thanks...will try it now. I was wondering what that was as it didn't seem to want to come off, but I will endeavor (no pun intended) to work on it a bit more!
-
Removing wiper assembly 2006 Endeavor Well, after some serious troubleshooting and talking to the manufacturer, AM Equipment, I decided to remove the whole wiper assembly from the beast. On a previous thread I mentioned wipers were not working at all. The 12 volt power is coming into the wiring harness, so I suspect a failed motor or seized wiper shaft/arm. Removed both wipers and removed the 2 bolts holding the motor in place and it "looks" like the only thing left is to push through the threaded wiper arm ends that hold the wipers in place. I can't see any retaining clip or anything that may prevent pushing it through from the outside to the inside, but the sucker doesn't seem to want to budge. Anyone have experience removing this assembly based on the pictures below? Again, it appears that the only thing left is to push the 2 threaded ends through to the inside, but it does not want to go that way. Perhaps there is some silicone stuck inside the fiberglass reinforced wall holding it in place. Anyways, before I go Rambo on this sucker, I thought I should ask for advice. I need to remove it to properly bench test it and see if it is the motor or just seized shafts and arms.


-
Just started my 2006 HR Endeavor coach up again for it's monthly run down the freeway and when I tried turning on the windshield wipers, all that happened was a short and quick jerk by both wipers that moved them about 1/4", then nothing. Tried again and same thing. This continued for a few times, so I decided to problem solve. Wiper motors inside do not look like they are moving when switch is activated, and I do not hear or notice anything abnormal. Worked fine 4 weeks ago. This coach had the recall on the OEM wipers that were recalled back in '08. Faulty ground connection? I can't seem to locate a ground inside because all of the wires disappear in a coiled bundle behind the generator. Any ideas? Thanks in advance! Perhaps there is a fuse or solenoid somewhere?
-
Radiator replacement
guy_ethier replied to Barry W's topic in Engine, Transmission, Engine Cooling, & Hydraulics
Barry, Thanks again! 👍 -
Radiator replacement
guy_ethier replied to Barry W's topic in Engine, Transmission, Engine Cooling, & Hydraulics
Barry, Thanks for the pics. Approximately how much coolant did you lose when doing the CAC RE and RE? Did you let it fall into a bucket and, if so, where is the best place to place it? Also, is the CAC very heavy? One man job, or 2 like Radiator? Any other words of wisdom/precautions are much appreciated. Thanks again for the pics...as Monacomama would say: "A picture is worth a thousand words." I miss her sayings of wisdom on the IRV2 site. ~ cheers, -
Radiator replacement
guy_ethier replied to Barry W's topic in Engine, Transmission, Engine Cooling, & Hydraulics
I assume that you must access the top part through the bedroom closet inside the coach as that would be the only way to reach the top bolts, from what I am able to see crawling underneath my '06 Endeavor (sister coach to the Diplomat)? I find just changing out the oil filter enough of a contortion for these 'ol bones! -
Radiator replacement
guy_ethier replied to Barry W's topic in Engine, Transmission, Engine Cooling, & Hydraulics
Any chance you could post pictures long the way? That would certainly help anybody else out here who needs to change out their radiator and get access to these rear mounted ISL fans. Thanks for any pics/videos! -
Lippert entry steps question
guy_ethier replied to guy_ethier's topic in Body, Awning, Roof, Slides, & Steps
thanks😉 -
Lippert entry steps question
guy_ethier replied to guy_ethier's topic in Body, Awning, Roof, Slides, & Steps
Do you have a picture/link to the bushings you got? Where they the 2 step or 3 step model (don't know if that makes any difference to the motor) I was thinking bushings as well based on my lawnmower rear drive wheel problems that always seem to end up with the rear wheel bushings. -
Lippert entry steps question
guy_ethier replied to guy_ethier's topic in Body, Awning, Roof, Slides, & Steps
I have heard some people say that they can be taken apart (I assume they are referring to the steps themselves) in order to clean where the arms meet the steps. Never tried that before, so am looking for some guidance. I have pressure washed the top and front of the steps before with no difference...but perhaps I needed to focus on the arms where they meet the steps? -
Been reading quite a bit on entry steps, mostly Kwikee, but have not read anything regarding this topic.SCS Lippert 2 step entry steps makes a loud grounching sound both extending and retracting. 2006 Endeavour. I had read somewhere that they need cleaning, so, decided to give it a shot.After cleaning the visible outside stuff, I crawled underneath and decided to unbolt the 3 bolts holding the motor to the step gear housing. After breaking off 2 of the bolts below the frame rail and removing the motor, I drilled out the 2 broken off bolts, re threaded them for a slightly larger bolt, then attemped to re assemble. Whoops! Didn't realize that the motor housing bolt holes were not big enough and that's where she broke apart.Ordered a new one to arrive tomorrow from Amazon for $149.00 CDN (surprised the hell out of me 'cause I was sure they didn't exist anymore) and after playing around with the old motor housing found a way to enlarge, ever so slightly, the holes on the motor housing to accomodate the new bolts.Question though...will this stop the grounching noise that I hear whenever the steps go in or out? If not, is there anything else I should look for? Lippert says that it is not necessary to lubricate anything (although I did use dry Teflon lube) and I cannot see anything out of alignment or bent.Is there anywhere else I can/should clean? Any pictures of where this should happen would be welcome. Steps always seem to work...just sounds like someone is rocking a very noisy wheelchair or opening a very rusty screen door whenever it extends or retracts. Would like to do this now that the motor is out of the way.Thanks!
-
And you think you have it bad there, eh?
guy_ethier replied to guy_ethier's topic in General Motorhome Discussion
Ha! Tell that to the wife....been trying to move to the prairies since forever and she loves it here till the day she dies, she says. 46 years of married "bliss?" -
And you think you have it bad there, eh?
guy_ethier replied to guy_ethier's topic in General Motorhome Discussion
Yes, by taking the Alaska Ferry from Bellingham, WA if it is still running Not cheap, but still cheaper than the price for diesel at 3800 miles round trip figure around $1.75 per mile approx.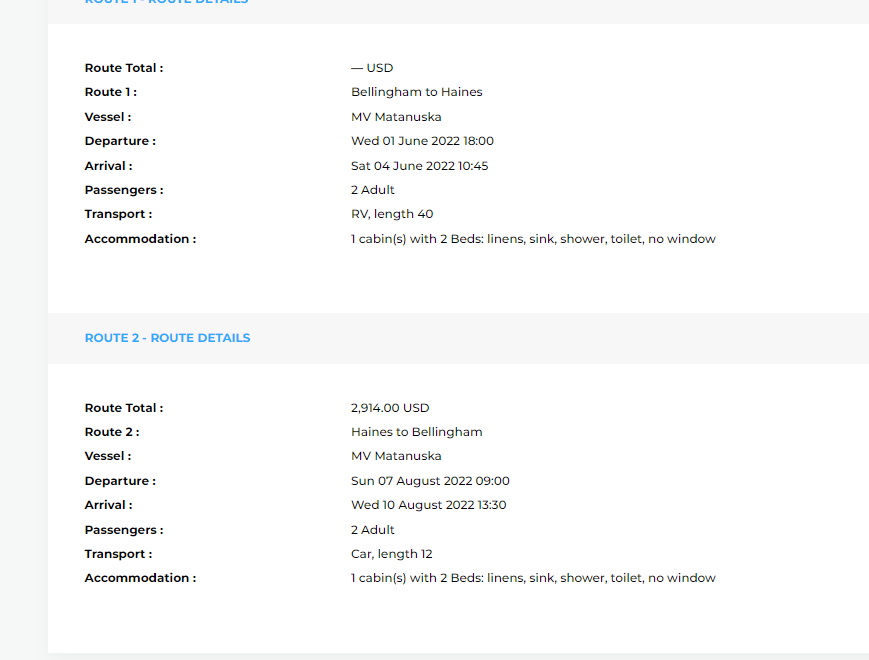
-
And you think you have it bad there, eh?
guy_ethier replied to guy_ethier's topic in General Motorhome Discussion
$7.59USD a gallon. I am literally gobsmacked! Holy moses! Where will it end? -
Price is for regular unleaded with Diesel costing up to 10 more cents per liter. You do the math. AND, the price is expected to increase by 10 more cents a liter by the end of today. With these prices, that driveway anchor is getting bolted to the driveway now! Nothing but price gouging by these lame fat cat oil companies (makes me wish I had bought some oil stock, though, awhile ago), like buying Amazon, Apple and Google stock back in the late '90s. Oh well, it is what it is, eh? By the way, this is in Surrey, British Columbia, Canada, where we have the highest cost of living and the highest taxes!

-
Roger. Did you do the recovery tank install yourself and, if you did, was it pretty straightforward or did you have to modify it a bit? I would love to see some pics of your install and any problems/ adjustments you had to make. Also, what price did the new coolant tank set you back? Thanks☺️
-
Skipper. Just changed mine yesterday, after going 12 years since the last time I changed 'er out....yikes! I originally had the green stuff in there from the factory. When I went to test it for SCA the sample I drew came out rusted in color and I decided it was time to drain, clean, flush and change it over to OAT extended coolant from Cummins. Took me the better part of 6 hours by myself but the Cummins Restore Plus did an excellent job of removing all of the contaminants that were in there. When I first added the Restore Plus, after I had drained the brown rusted coolant, then took the coach out for a 90 minute run as recommended by Cummins, the fluid came out black when I drained the Restore Plus out of the lower hose. Added tap water 5 more times with a final rinse of distilled water until the color was almost clear. I then added 8 jugs of OAT extended coolant premix, as recommended again by Cummins, and now no more adding DCA, just testing and topping up the coolant as required. Long job, but worth it. Cummins has excellent information on their website for how to do this. It is not necessary to get the whole system purged of the green ethylene glycol that was originally in there, even though I think I came close, as they tell you that you can have a certain percentage of the other coolant in there without worry when adding the red stuff (OAT extended), as long as they are both ethylene glycol or propylene glycol based. The plastic type of OEM coolant recovery tank that Monaco used is almost impossible to see coolant levels. I use a clean dipstick when checking but others have swapped out their OEM plastic tank for a more durable steel tank. That will be in my future as well.

-
Ray, I guess he was replying, not to the thread topic which was Roof Sagging but, to a town in Oregon that was misspelled twice by previous posts. I get the U in Coburg, not E as in Coberg, but still do not see the reason for the O in Ducks? Unless many people call them Docks? Or is it their season record of 0 wins, which makes even less sense as they are 4-3 this season? Thanks for clarifying the Coburg part.
-
Bob, Sorry, I still don't get it. Can you explain it to me in Hillbilly terms? Not being cute, just don't see it?😖
-
Dennis, Little bit slow this morning....what do you mean?


