


Jim Byrd
-
Posts
91 -
Joined
-
Last visited
Content Type
Forums
Downloads
Articles
Gallery
Blogs
Events
Store
Posts posted by Jim Byrd
-
-
19 minutes ago, birdshill123 said:
Your dryer plug is 220. You may have fried something.
I concur, most likely you have damaged the control board and/or the compressor.
Your best option is to contact your local authorized Samsung repair facility.
It is difficult to troubleshot or repair the unit with it in the RV. When I has an issue with mine I was told that they would not attempt to work on it while it was in the coach. The control board is only accessible after removing a cover from the top of the refrigerator. Fortunately for me the problem was contributed by not getting the doors properly closed and it caused the evaporator on the refrigerator to freeze up.
Sorry to hear of your wounds.
Jim
-
8 hours ago, Harvey Babb said:
In normal operation the burner should never cut off until the thermostat tells it to.
It sounds like your burner is blowing out, which will cause the control board to shut off the gas, wait for purge time, and re-light it. If so, definitely not normal!
A faulty HI TEMPERATURE cut-out switch will shut the burner down. Once the unit cools down the HI TEMPERATURE will automatically reset and if the thermostat is still calling for heat the burner will relight.
-
I second RV PARKY, it easy to use, has great features and it's FREE.
-
47 minutes ago, erperry_44 said:
If the value stem was square I could use a pair of pliers but it is diamond shape. <sigh> And since everything is OLD plastic, I have to be careful. 2001 HR.
I just thought that it was square because the red one that I saw was square. You might me able to modify a red one with a little imagination.
After educating myself it looks like the older style valve has a smaller diamond, that being the case it should be relative simple to resize the newer style red tool by shimming the diamond to make it smaller.
Sure like your coach, it's a beauty.
-
If you measure the square valve stem and the ID of the hold to access the stem you should be able to find one in the plumbing department of any good hardware store.
An 8 point socket wall also fit a square valve stem.
-
On left side of the dash, next to the wiper switch.
-
32 minutes ago, Fred L said:
I thank all that have supplied some possible solutions. Reading, I'm willing to say it may be the Nason switch, where ever that is. I cannot get access up (at least not yet) below the dash. My unit has boards I guess screwed or fasten some way. I will get on my back tomorrow and take a look. I hope to leave for the Fl Keys by weeks end and really don't want to go to the service shop again. I do most of the work on this RV. Since I hit 100,000 coming back from the Keys last year I took it in for engine and trans inspection. There was an ABS light that would come on now and then, the tech said it needed adjusting. Engine and trans are in good condition, but was unable to track down the beeping horn. The Nason pdf was very good info.
BTW What is the purpose of the Nason switch, and where is located? I'll be using goggle on that.
Thanks again to all Stay safe
The Nason switch is to warn you that you not to take off unless you release the brakes. The switch is located one the valve that you set and release the air brakes.
-
2 hours ago, Bruce B said:
I had something similar once and it was the Nason switch on the air brake.
I agree, it's easy to change and readily available. The buzzers that are under my 04 Holiday Rambler are accessible without and dissembling of he dash, just reach up under the dash from the left side of the steering wheel and you will feel them. On my coach the wires were long enough position the buzzer to disconnect the wires when I replaced my buzzer.
-
There is a pressure switch that monitors when your air brakes are on or off, sounds like that has failed.. The switch is mounted on the AIR BRAKE valve on the drivers console, it's easy to change. They are readily available at any parts store that carry truck parts.
I has the same thing happen on my coach.
Jim
Jim
-
Sounds like furnace is short cycling. The most likely cause for this condition is an over temperature condition that is caused by restriction in the air flow, You need to check the intake and discharge air duct work for any restrictions. A faulty over temperature protection device that is operating at a lower temperature.than designed could also cause your problem.
When I purchased my 04 Holiday Rambler I had the same problem, After much frustration finally determined that it was caused by insufficient air flow in the duct work, the air temperature was found to be greater than setting of the over temperature device. Checked back pressure with a water manometer and found back pressure was greater the manufactures specification. Added an additional discharge vent, problem solved.
Jim
-
21 minutes ago, pwhittle said:
I had previously posted this as a reply in another thread, but I have referred people to it and wanted to have an easier way for them to locate it. I have also made some updates to the original post here.
I cleaned my Big Boy once, and when it needed it a second time, I replaced it (and the BIRD circuitry) with a Blue Sea ML-ACR. A much better solution that costs less than a Big Boy Relay.
The ML-ACR is a simple device that does one thing: connects or disconnects the house and chassis batteries. It has automatic voltage sensing so that if either bank is being charged and the other is not, then it will connect the two banks of batteries.
The features I like about it are
- Will charge both sets of batteries from the alternator or output from the inverter/charger
- Auto mode as well as manual off and manual combine override via the remote switch or on the relay itself
- LED status indicator on the remote switch that replaces the Battery Boost switch in the dash/side panel
- Takes no current to hold it in either position, so does not run hot
- Sealed from the elements
- Senses charging on either bank of batteries to combine in Auto mode
- Has high current ratings
- Continuous Rating 500A
- Intermittent Rating 700A (5 Mins)
- Cranking Rating 1450A (30 seconds)
- Lifetime warrantyI had previously replaced the diode based isolator and battery boost relay with the ML-ACR on our 1994 Signature and it has operated without issue since 2014.
I have helped Vanwill replace the same setup on his 2000 Dynasty and another friend on his 2002 Signature.
In those cases the ML-ACR replaces the isolator, the Battery Boost Relay, and the Lambert style or Trik-l-Amp or Trik-l-Start solution to keep both sets of batteries charged.
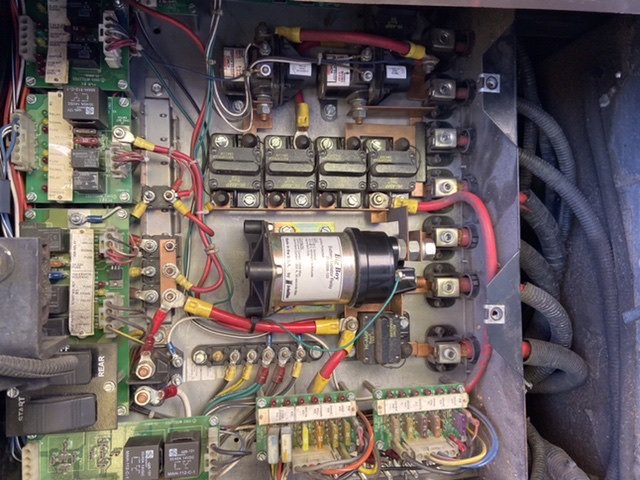
For our coach the ML-ACR replaces the Big Boy relay and renders the circuitry that drives the Big Boy unnecessary. I left the circuitry in place and just taped up the outputs that would go to the Big Boy.
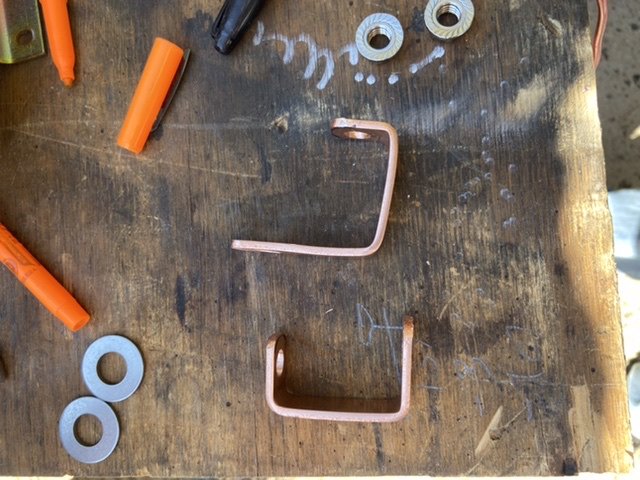
Mechanically the ML-ACR is a similar size to the Big Boy relay and we used 1/8”x3/4” copper bar to connect the ML-ACR to the existing wiring.
We also ran a pair of wires from the RRB to the dash for the remote switch. We could have run one wire and reused the existing wire from the Batt Boost switch.
The remote switch also needs fused power and ground which we picked up from the FRB.
Notes:
- It is possible to build relays or some other logic to drive one of the Isolation inputs on the ML-ACR to disconnect the batteries when you have two charging sources such as when the generator is powering the Inverter/charger and the engine alternator is providing charge as well. I chose not to do that, and just use the switch on the dash to disconnect the two battery banks to let the alternator charge the chassis batteries and the inverter/charger to charge the house batteries
- If you have different type of batteries, say house AGM and chassis lead acid, you should consider not leaving both banks connected all the time when you are on shore power where the Inverter/charger is configured for the AGM batteries as that could overcharge the chassis lead acid batteries and damage them. This may have contributed to the death of our original chassis house batteries, but they were in the coach when we bought it, so they may have just lived out their useful lives. When I replaced them, I installed Duracell AGM's to get close to the Lifeline AGM House batteries in charging voltages. You can always connect the banks the day before you are ready to travel or if you see the charge is down on the chassis batteries.
- This is not a suitable solution when the house batteries are Lithium. Lithium batteries require a different charging profile than AGM or Lead Acid so you would preferably install a DC-DC converter to keep both sides charged when there is a single charging source instead of connecting both banks
Manufacturer link: ML-ACR Automatic Charging Relay with Manual Control - 12V DC 500A - Blue Sea SystemsPaul


I replaced my BIG BOY with a COLE HERSEE part# 48530 Smart Battery isolator 200A. .
I have the Blue Sea ACR on my boat, but I chose the Cole Hersee for my MH because it was the exact same physical dimensions and terminal locations as the BIG BOY that it replaces and it was also cheaper than the Blue. The COLE HERSEE has the same operational features as the Blue Sea ACR.
It also shares the same disadvantage that one has to make sure not to having your inverter/charger in the charging mode when you have the chassis engine running.
Jim
-
 1
1
-
-
The Talin website says their tank dimensions are 14" x 14" x 14"., price $469.
Jim
-
Not sure about the 1850, I know on the 1870 thru 1875 have the same mounts. To remove them you just remove the small wood trim that is just above the microwave and it provides access to the 2 main screw that fasten the microwave to the wall bracket. The wood trim is is just wedged in there are to fasteners holding the wood trim in place.
Jim
-
There are a couple of aftermarket aluminum ones available.
Source Engineering
Veurink's RV Center.
 RV Center


04 Neptune ISB 300 Cummins fuel pressure issue.re
in Engine, Transmission, Engine Cooling, & Hydraulics
Posted
If your engine is a 24 valve one the early models has the electric pump mounted on the engine, later years they were either mounted in or close to the fuel tank, depending on chassis manufacturer.
My brother in law has a similar problem the had low voltage at the fuel pump, found problem to be corrosion on fuel pump inline fuse holder.
Jim