


saflyer
-
Posts
450 -
Joined
-
Last visited
-
Days Won
1
Content Type
Forums
Downloads
Articles
Gallery
Blogs
Events
Store
Everything posted by saflyer
-
I have a Cummins ISC 330 with an Allison 6 speed transmission. I have heard it's possible to increase the horsepower and torque without an engine change. The two options I think might be possible are a programming change by the Cummins shop or some aftermarket kits from a company like Banks Power(I believe there might be another company doing similar work but can't remember the name). Is this a possibility and, if so, is it a good idea? Are the other components of the drive train strong enough to absorb any extra power. I have heard for all of the different HP/torque models of ISCs the rest of the drive trains are the same but don't know that for sure. If so would the cooling system be adequate for an increase in power? I have been towing a 6000# toad but may need to pull about 2500# more in the future. That starts to push me up towards the tow limit. Ed '05 HR Ambassador 40 PLQ 2017 Expedition Limited 4x4
-
Monaco/ Holiday Rambler equivalents
saflyer replied to saflyer's topic in General Motorhome Discussion
Thanks a bunch. Looking for a replacement water bay storage door so I needed to tell salvage yards to look at both manufacturers. Got a quote for a new one from REV. Less than I expected but still a lot of money. Ed -
What is the equivalent Monaco line to my 2005 Holiday Rambler Ambassador? Thanks, Ed
-
That's for sure. Now if I can just get enough duct tape. The beauty is my coach is just about the same color as gray duct tape. Maybe it won't quite look like the Joads going down the road. (But then again, I am an Okie) Ed
-
The door seems simple enough. Will have to look closer at the hinge. Thanks, Ed
-
I backed my Holiday Rambler out of the storage building to check some things out in the water service bay. Told myself to be sure to close the service bay door before driving back into storage. Decided to leave the coach out for the night since I planned to take it to the shop the next day. Very little chance of rain but since one of the A/C shrouds was removed by a tree limb (another story) I went out after dark to put it up for the night. Of course I didn’t check the open service bay door so it is now folded in half and removed from the motorhome. What is best source for a replacement, new from factory, salvage or new fabrication by a shop? Ed ‘05 HR Ambassador
-
Great idea. Makes me think we can fill a jug with water to flush the toilet enroute and hit the road.
-
South? Rio Grande Valley was in the low 20’s! I’m dreaming of the Keys.
-
That’s great Dave. Nice and simple. The one I have has a Schrader valve. Thanks, Ed
-
I’m making headway but here are few things I need clarification on: (1) There is a picture on the water service bay panel showing the city water/tank fill valve and a tank shutoff valve. Verbiage says to see owner’s manual for more information but I don’t find any. As mentioned by others on this thread I believe the lever is positioned to tank fill then air blown in to clear the inlet and main fresh water drain and low point valves. Then it is put in the city water position to drain all of the faucets. Is that correct? What is the tank shutoff valve? I only find the fresh water tank drain valve. (2) There is a Winterize Connection port and it says to see owner’s manual but I don’t find anything on it. I believe it might be to put antifreeze into the system rather than using the gravity fill port. But how ones it work? What is the path for the antifreeze from the port to the pump? For some reason there is so little flow of water from the fresh water tank to the pump that I can’t use the antifreeze method. Maybe this Winterize Connection will help me overcome that problem. (3) The Atwood water heater drain instructions say there is a Master On/Off switch on the back of the heater. I have to access the back of it through a small door in one of the basement storage bays. Can’t see much but haven’t found that switch. Can anyone tell me what it looks like and where it is located? The Splendide combo washer/dryer instructions from the manufacturer has winterizing instructions fir antifreeze method only. When search for the water heater information I found Holiday Rambler instructions for winterizing it with air pressure. A side note on the air pressure method. Using a standard air pressure chuck gets very tiring holding it on the air inlet valve adapter for the water hose. Does anyone know of a better adapter that can be clamped on so I don’t have to hold the two hoses together constantly? Pictures would be helpful. Thanks for all the help.


-
That’s helpful. Simplicity is usually best. I’ll try that next time. BTW, I broke the head off the nylon drain plug a couple of years ago. What a pain. I just saw a video addressing what to do when that happens. The main takeaway is, since they age and fatigue, install a new plug every year.
-
Sounds like a nice, simple solution.
-
When I pulled my water heater plug the water pulsed out and I only got about 1 gallon. Maybe if I had opened the lever on the faucet near the top front of the water heater it would have released the vacuum an the water would have flowed better.
-
Thanks Bill. I’ve done most of that. I have a water heater, Atwood. The only thing I haven’t done is turn the fill valve to tank and use the compressed air. I don’t know what this will do but I’ll try it tomorrow. What I do know is, with the water source set to city water, the low point and potable water valves set to drain and a faucet open nothing happens when I put air pressure on the water source hose. Let’s go back to that tank source valve in the picture in my second post. What and where is it if it is not the portables water drain valve? The instructions say to open it along with the low point drains then blow air in. After that leave them open until de-winterizing. That’s all the instructions say. Ed
-
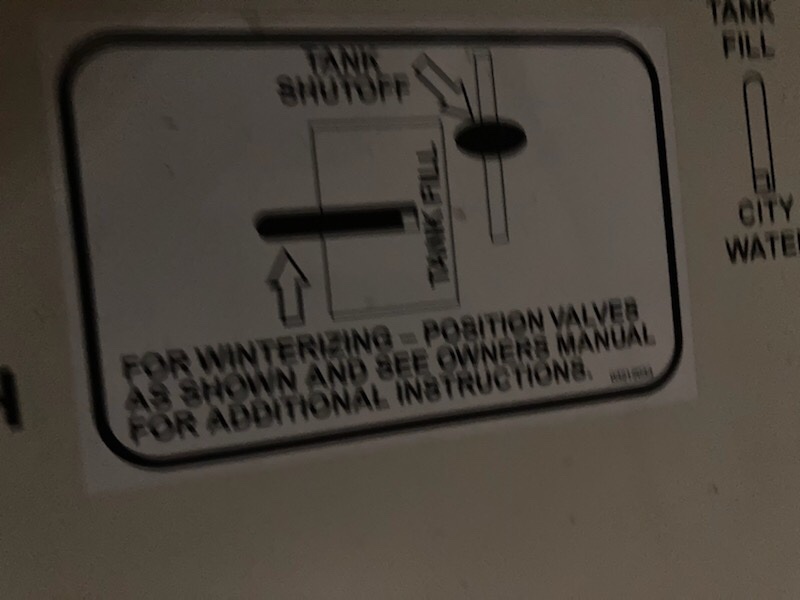
Just came back from trying to blow air through the faucets. Didn’t get any spitting of water as I expected nor any air noise at the faucets. Nothing in the book is said about the positioning of the water fill valve so I assumed it should be in the city water position. However there is a sign on the wall or the water service bay (see attached) that says, for winterizing, the water control valve should be in the fresh water fill position, horizontal, and the tank shutoff valve should be in some center position. Now the picture is clear as mud to me. Put the lever in the horizontal or vertical position since it’s labeled “tank fill”?And what/where is the tank shutoff? More to the point, is this set up for when using the compressed air or antifreeze winterizing method? Or both? Ed ‘05 HR Ambassador
-
I have never winterized my garaged motorhome before but our temperatures in Oklahoma are supposed to stay well below freezing for longer than I can remember. I’ll use the air pressure message but the instructions are a little unclear on some points. First, the air pressure method says the water heater drain is in the back of the tank but the antifreeze instructions says it’s in the front. Given there is no way to get to the back of the tank without removing the whole assembly I think I’ll go with it being the nylon plug in the front. That, however leaves something to be desired. When it is removed the water pours out on the flat area of the box below it so the flow can’t be directed into a bucket. All of this is to ask is there any plug for the drain available that has an on/off valve and means of attaching a hose so water doesn’t go all over the floor? Second, I know where three of the low point drains are but, referring to low point drains, the book says they are next to the “Manibloc manifold”. I don’t have the slightest idea what that is nor does the book tell mean. Am I looking for any other low point drains besides the ones under the water pump? Third, there is a hose fitting on the water service panel (see attached image) that isn’t in the book picture of that panel. It is labeled “winterize connection”. I find nothing about it in the book. Does anyone know anything about it? Thanks Ed ‘05 HR Ambassador

-
Entry door scissor replacement
saflyer replied to saflyer's topic in Body, Awning, Roof, Slides, & Steps
Thanks a bunch. My only fear is getting it positioned correctly. I can picture a bunch of holes in the door and/or frame. Ed BTW, Lippert apparently is offering their friction door hinges for the aftermarket (I may have read that on this forum). Nothing much on their website about it. I’ve got a request in to them for more information. Ed ‘05 HR Ambassador -
Somewhere, on some forum there was at least one thread about replacing the entry door scissor hinge with a piston product. I've searched several forums including this one and can't find it. Can anyone steer me to the thread or possibly a file on the subject? Thanks, Ed '05 HR Ambassador
-
Penguin II 15K & 13.5K A/C HP replacement units
saflyer replied to mandms59's topic in AC, Heating, and Cooling
Do you think the new units are quieter or the same noise level? That’s one of the reasons I would change mine. Are any other manufacturers units quieter? Ed ‘05 HR Ambassador -
Onan 8000 QD generator in a Holiday Rambler Ambassador. Planning to switch my house batteries to lithium and the question arises: “Can the lithium’s put out enough current to start a diesel generator”? Lion Energy UT 1300 battery specs are 900a for 1 millisecond, 250a for 1 minute and 150a continuous. I’ve sent this question to Onan but thought I’d ask here. Thanks
-
I’m getting closer to installing my LiFePO batteries. I just read something I hadn’t thought of before. Actually, in a way the subject did come up. Previously, the issue arose that lithium house batteries may not be very useful to help the chassis batteries if they are too low to start the engine. Now an added issue. I only recently found out my generator uses the house batteries to start. It was pointed out in an article I read that lithium batteries don’t have the current capacity needed to start a diesel generator. I do know that I usually have to crank the generator starter for some time when it is cold. Is this going to be a problem? Question two. I was planning to add a DCDC charger to effectively use the engine alternator to charge the lithium house batteries. Now I learn about a product called a battery combiner that will need to be upgraded. I have no idea what one of those is. I read the description but remain confused. Is it the same as my Trombetta relay? Does it replace it? I know the two voltages of the different battery banks are compared to tell the system when to charge the house batteries when the alternator is charging? Can someone educate me on this? Ed ’05 HR Ambassador From amsolar.com: 2. Alternator Charging: When upgrading to lithium batteries you will need to upgrade your battery combiner for alternator charging. Without this modification, the higher resting voltage of a lithium battery will trick the existing battery combiner relay into thinking the alternator is running and the lithium battery bank will be paralleled to the starter battery, even when the ignition is turned off. The result is lithium batteries draining into the starter battery until they crash to a dangerously low voltage or the lithium batteries’ internal BMS engages, preventing further discharge. If you have a lithium battery system that can handle a charging current of 150A or more (three or more Battle Born lithium batteries), and you do not have a smart alternator (here’s the Smart Alternator Test) you use the Victron Cyrix-Li-Ct battery combiner, variant “Lithium / 230A”. The Victron Cyrix-Li-Ct can quickly charge a lithium battery up to about 80% state of charge. If you have a smaller battery bank (one or two Battle Born batteries) and/or a smart alternator, you will need to use the Sterling Battery to Battery Charger. The Sterling is programmable for any battery chemistry and can bring a battery up to 100% state of charge. Neither device is needed if you plan on using AGM batteries. Estimated Installation Labor High Current Alternator Charging 3 hours / $435 Victron Cyrix Battery Combiner from 40.00 Victron Cyrix battery combiners connect your house battery bank to your starter battery and alternator to allow alternator charging. Additionally, when a charge is applied to a house battery bank the Cyrix will close and allow current to flow to the starter battery. Select an appropriate Cyrix based on your house battery type and alternator current rating. Alternator 160A or less - 120A Cyrix Alternator more than 160A - 230A Cyrix Battery Type / Rating: Select Battery Type / Rating AGM / 120AAGM / 230ALithium / 120ALithium / 230A Quantity: ADD TO CART Sterling Battery to Battery Charger 12V/60A 425.00 This device is ideal for lithium alternator charger system upgrades in motorhomes where a smart alternator is used, or when the lithium battery bank cannot handle high current.
-
I’m getting closer to installing my LiFePO batteries. I just read something I hadn’t thought of before. Actually, in a way the subject did come up. Previously, the issue arose that lithium house batteries may not be very useful to help the chassis batteries if they are too low to start the engine. Now an added issue. I only recently found out my generator uses the house batteries to start. It was pointed out in an article I read that lithium batteries don’t have the current capacity needed to start a diesel generator. I do know that I usually have to crank the generator starter for some time when it is cold. Is this going to be a problem? Question two. I was planning to add a DCDC charger to effectively use the engine alternator to charge the lithium house batteries. Now I learn about a product called a battery combiner that will need to be upgraded. I have no idea what one of those is. I read the description but remain confused. Is it the same as my Trombetta relay? I know the two voltages of the different battery banks are compared to tell the system when to charge the house batteries when the alternator is charging? Can someone educate me on this? Ed ’05 HR Ambassador From amsolar.com 2. Alternator Charging: When upgrading to lithium batteries you will need to upgrade your battery combiner for alternator charging. Without this modification, the higher resting voltage of a lithium battery will trick the existing battery combiner relay into thinking the alternator is running and the lithium battery bank will be paralleled to the starter battery, even when the ignition is turned off. The result is lithium batteries draining into the starter battery until they crash to a dangerously low voltage or the lithium batteries’ internal BMS engages, preventing further discharge. If you have a lithium battery system that can handle a charging current of 150A or more (three or more Battle Born lithium batteries), and you do not have a smart alternator (here’s the Smart Alternator Test) you use the Victron Cyrix-Li-Ct battery combiner, variant “Lithium / 230A”. The Victron Cyrix-Li-Ct can quickly charge a lithium battery up to about 80% state of charge. If you have a smaller battery bank (one or two Battle Born batteries) and/or a smart alternator, you will need to use the Sterling Battery to Battery Charger. The Sterling is programmable for any battery chemistry and can bring a battery up to 100% state of charge. Neither device is needed if you plan on using AGM batteries. Estimated Installation Labor High Current Alternator Charging 3 hours / $435 Victron Cyrix Battery Combiner from 40.00 Victron Cyrix battery combiners connect your house battery bank to your starter battery and alternator to allow alternator charging. Additionally, when a charge is applied to a house battery bank the Cyrix will close and allow current to flow to the starter battery. Select an appropriate Cyrix based on your house battery type and alternator current rating. Alternator 160A or less - 120A Cyrix Alternator more than 160A - 230A Cyrix Battery Type / Rating: Select Battery Type / Rating AGM / 120AAGM / 230ALithium / 120ALithium / 230A Quantity: ADD TO CART Sterling Battery to Battery Charger 12V/60A 425.00 This device is ideal for lithium alternator charger system upgrades in motorhomes where a smart alternator is used, or when the lithium battery bank cannot handle high current.
-
Thanks
-
Output current. I think it’s 160a but want to confirm. Ed
-
Have you looked into these, as recommended by Will Prowse? You use 3M VHB tape to secure them to the roof without drilling holes. https://www.amazon.com/gp/product/B01MQF8BL1?pf_rd_r=CCZH9D664P0XSDN64C26&pf_rd_p=9d9090dd-8b99-4ac3-b4a9-90a1db2ef53b&pd_rd_r=2f9d9dba-551f-482a-8b0c-499fb00c5448&pd_rd_w=ORgOC&pd_rd_wg=1gFQh&ref_=pd_gw_unk ED '05 HR Ambassador


