


cbr046
-
Posts
1,314 -
Joined
-
Last visited
-
Days Won
9
Content Type
Forums
Downloads
Articles
Gallery
Blogs
Events
Store
Posts posted by cbr046
-
-
Too bad we can't fit the electronic torque adapter on the multiplier socket!
Thanks for the tip. Looks like the next purchase, which of course I will procrastinate until I need to add air again.
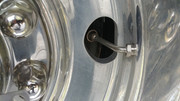
If I move this valve stem inward (or 90d), is there an o-ring under the nut? Is it a flare type seal?
Best,
- bob
-
I looked at those but was concerned #1 the anchor leg wouldn't fit against an adjacent lug nut and # 2 still need to re-torque. It would make removal MUCH easier! They say they will mark up the aluminum (thin hub cover is under the lug nuts) but maybe can be fixed with a plate. Hard to say without buying one . . .
As for re-torquing . . . . a longer breaker bar, or some good pipe! I already have an electronic torque adapter coming.
- bob
-
The saga continues. I was able to install 1 of 4 extenders. Pitiful! One wheel the hub cover tabs line up, but the outer wheel valve stem points into the wheel and the Wheel Master extender just doesn't work unless the valve stem is pointed outwards (or at least not between the wheel). I knew that going in so no surprise. Can the outer valve stem be removed and rotated without destroying the seal / o-ring / whatever? Biggest fear is getting it out and creating another problem.
On the other wheel the stems aren't 180 apart and neither line up with the hub cover tabs. Now here's the rub - lug nut socket arrived today when I discovered my 4 ft breaker bar is really 3 ft. *IF* the lug nuts could be loosened with 500 ft lbs that would 170 lbs on the end of that bar. That's 20 lbs more than me!
So do I take it to the truck shop or get a bigger breaker bar? I'm not afraid of man-handling the wheel . . . . if it doesn't crush me first!
Best,
- bob
Post Script - All 4 rear valve cores were jammed open when the TPMS sensors were removed. Partially unscrewing the core and re-inserting usually fixes it. One core was physically damaged at the inner tip, and I felt something as I was pulling it out. Balancing bead maybe (and if so the wrong kind).
At least all 6 have 90+psi now.
-
X3! Very sharp! On ours the floors had been re-done like that and there's some scraping from the slide behind the driver's seat. Maybe it's a slide adjustment, maybe something else, but you might look to see if there's any interference before it starts showing up.
Best,
- bob
-
I've been battling this also . . . .
PO had installed TireMinder TPMS. On the fronts the sensors push the cores into the stems. When removing the sensors to add air (or double check with a gauge) the stems gush out air. New cores don't help, but I can back out the core and screw it back in and it will seal. Set the air, re-install the sensor and repeat next time I need to second guess the TPMS sensor.
I'm afraid to check the back wheels because the outer wheel sensor is pointed into the middle of the tire. The only way to access is to crawl under and blindly stick an arm between the tires. The inner tire sensor is the same access problem. If I have to fiddle with either inner or outer valve cores it'll be challenging.
So I bought the Wheel Masters 8110A 4 hose set . . . . and discovered the left side inner sensor isn't aligned with the hub cover (mounting tabs are already on the hub cover). And the inner stem isn't 180 degrees from the outer valve stem. That outer wheel will need to be rotated slightly (and hub cover aligned). On the right side everything is aligned. Two different tire guys?
*THEN* discovered none of the tire tools from the F53 are compatible. The joys of a new coach! So on the way are the socket (1 5/16), some 3/4" extensions and a 750 ft lb torque adapter (electronic type). I have a 4 ft breaker bar to use on it, but probably won't arrive before next Friday (the next trip). RM R8RR - 500 ft lbs, right? I'm considering the gutentite method.
The saga will continue . . . .
Best,
- bob
-
OK, my bad. I just looked at some old photos of the Coleman Mach III from the roof of our 02 Fleetwood. R-22 on the plate and compressor. It was built 46th week of 2001.
Sorry to waste a lot of bandwidth!
- bob
-
 1
1
-
-
Right, but R-22 is like a 90's refrigerant, right? All my 2000+ vehicles are R-134. Maybe I'm missing something?
- b
-
1 hour ago, Paul Busch said:
I just tapped all three of my units and one used stop leak with a charge of R22 . . . .
05 sig
R22?
- b
-
I would say yes - can be fixed.
Ours wasn't working so good so an HVAC friend installed a tap and recharged the freon. If it's a slow leak no problem. If it's a monthly recharge a good tech can locate the leak and repair . . . . or replace at a much higher cost.
Best,
- bob
-
On my 03 HR Endeavor that would be the water pump switch, but there's an indicator light next it. The lights might fluctuate with activation of the pump but you'd also hear the pump.
Different platform, different year, just what's on mine.
- bob
-
Keep in mind WD-40 is NOT A LUBRICANT. Never was, never will be. If anything I'd try some silicone spray as it won't attract dirt like oil will.
Best,
- bob
(NOT a petroleum engineer)
-
30% 5-star and 20% 1-star . . . . given the ratings I wouldn't get my hopes up.
- bob
-
Ours leaked at the regulator just rear of the air tank. I could hear it leaking after I crawled under. I could run my fingers near the air leak and hear a change in sound.
But yeah . . . . make sure you have good jacks under it.
Good luck,
- bob
-
1
-
-
BTW, I found I could look into the high beam (lights off) and see the LED magnified by the lens. By centering my vision on the LED I can determine pitch. On top of the assembly there's a sight glass with a bubble but it's very hard to see.
The adjusters are a 4 mm male hex sticking up vertically from the back of the units. One for U/D the other for L/R.
- bob
-
The "wing style" antenna has 12v running through the coax that's turned on with the amplifier switch. There's an amplifier in the antenna. Whether this is directly compatible with the Winegard Air 360+ I don't know.
The yellow wire might be for an "antenna raised" sensor? Does it go to the small module on the antenna shaft?
- bob
-
Previous owner replaced ours (2003 HR Endeavor) with units for 2000-2002 Lincoln LS made by TYC through Amazon. They're close but not a direct fit and get a GREAT view up to 50 ft. The TYC's are no longer available but maybe another Taiwan replacement. I just got done shimming the mountings which might get me in range for the adjusters. Not sure when I'll get to try them at night. You want a 2" drop at 25 ft.
I've heard late 90's BMW 3 series are the ticket.
Another option is a headlight restoration kit. Just be sure to apply a UV sealant to prevent re-yellowing. Because this is a factory fit this would be my personal preference. My LS headlights are just screwed in with alum brackets and sheet metal screws.
Best,
- bob
-
I can't comment on your situation but you can pick up owners manuals at https://www.monacocoach.com/rv-owners-manuals
And there's a Download tab at the top that has a wealth of information. Wiring diagrams that will make your head explode, Monaco Tech Tips, and so on.
Good luck,
- bob
-
I'm in trouble. Now I'll never get anything done. 448 pages. WOW!
Thank you,
- bob

Ceramic Coatings
in Body, Awning, Roof, Slides, & Steps
Posted · Edited by cbr046
Just a side comment . . . . I've read where Zep Wet Look Floor Polish is the hot ticket to make the finish look showroom new, but if you read the comments (Amazon) the Zep retail technical support rep says it will "whiten, peel, yellow and deteriorate. The Wet-look Floor Polish is not UV resistant and will require stripping to remove". So maybe not the hot ticket after all. Kudos to Zep for giving us the straight scoop at the expense of a few sales.
Nice job having your coach professionally done. Yes, we all want to know the cost (even if ballpark).
Best,
- bob