


granvillebarker
-
Posts
190 -
Joined
-
Last visited
-
Days Won
6
Content Type
Forums
Downloads
Articles
Gallery
Blogs
Events
Store
Everything posted by granvillebarker
-
Ivan, Where did you find the details on how to do the 3000hr service? — Granville
-

Monoco Windsor ‘02 leveling problem
granvillebarker replied to kgflawson57's topic in Compressed Air Systems
Richard, What is the blue valve for at the bottom of one of your pics? -
Hi Donald, I feel like mine smokes that much on startup, but it’s hard to tell. Have your valves ever been adjusted or the injectors serviced? I’m pretty sure that’s in the 1000 hr maintenance and I can see from your video your at about 1130 hours. I will admit I’m at over 2000 hrs and haven’t had my valves or injectors serviced yet. Does anyone have any idea what an Onan service center charges for that?
-
Monoco Windsor ‘02 leveling problem
granvillebarker replied to kgflawson57's topic in Compressed Air Systems
Dang, I don’t think I’ve ever checked those lines to the ping tanks, i will check them this week. If a 2006 has leaks in them, I’m betting my 2005 is in the same boat. -
I had one of the watering systems on my previous set of batteries in my coach and golf cart. Total waste of money, they would never get the all the cells filled. Go AGM or LiPo, at least with LiPo you can use allot more than 50% of your battery.
-
My temp sensors are with a bunch of Aladdin circuit boards in the top of the big bay on the drivers side of the coach.
-
Monoco Windsor ‘02 leveling problem
granvillebarker replied to kgflawson57's topic in Compressed Air Systems
It just unscrews, I’ll post back if the nitrous solenoid tool fits, once it arrives. It was in one of the links in my last post. I just realized it’s another thread... Yes, the center part unscrews, there are two indentions the tool should fit into, you can also use two of the solenoid nuts in a jam situation to get them out, but some of those nuts are a little soft for that. This latest service I went with brown orings, just to make sure I didn’t mix any up or miss any. The old ones were black. Just make sure you get everything super clean. Here are some close ups of the pieces, there’s also a spring in each one that’s not in the pictures:


-
HWH leveling question
granvillebarker replied to MSHappyCampers's topic in Chassis, Handling, Tires & Brakes
I know one of them has an extra pressure switch, and I think one has smaller air lines connecting to the back, but I’m not 100% sure on that. The solenoids are all the same on mine. You know on the little air compressor, mine always stopped because the motor brushes would get dirty and stop touching. I’ve cleaned them many times. That new air compressor you got doesn’t have brushes, so it probably would have worked fine under the coach where the old one was. -
HWH leveling question
granvillebarker replied to MSHappyCampers's topic in Chassis, Handling, Tires & Brakes
There’s not much other than the solenoids that goes wrong with the manifolds, I’ve never had a fitting or pressure switch leaking. There are some check valves on the side of them that I would think could leak. I’m not sure of their function though. i actually bought a spare six pack just for the solenoids about 8-10 years ago on eBay. That’s been my spare parts supply, and it’s been real handy lately with the coils starting to die. I’m going to use it to make the test jig. I just wish i could find 18 new pistons and springs for about 10 bucks a piece. If we only knew which of these would fit: https://wilson-manifolds.myshopify.com/collections/solenoids/products/nitrous-fuel-solenoid-rebuild-kits i found this on amazon, a little pricey though... Nitrous Express 15740 Fuel Solenoid Piston https://www.amazon.com/dp/B001GBHWN0/ref=cm_sw_r_cp_api_i_acoEFb3Y418TF I ordered one of these, at least it will tell me if they are about the same size. Nitrous Express 15733 Solenoid Maintenance Wrench https://www.amazon.com/dp/B001GBJOPE/ref=cm_sw_r_cp_api_i_7ioEFbRHVGTPS -
Monoco Windsor ‘02 leveling problem
granvillebarker replied to kgflawson57's topic in Compressed Air Systems
The company listed on there was gone when I looked, these are the same O-rings I got from amazon a week or so ago. I also use the super lube on them, I think it came from McMaster.com on a previous oring order.
-
HWH leveling question
granvillebarker replied to MSHappyCampers's topic in Chassis, Handling, Tires & Brakes
Yes, I did all three on each one. I’m talking about the little blue seal on the end of each of the solenoid pistons. It’s one more spot air can leak on them, some people have written about refacing them with a lathe. I’ve also been following a thread about similarities to nitros solenoids, and some of the nitros supply houses for racing sale similar pistons. I haven’t found any listings that show dimensions of their pistons, but I may call next week and find out more. It would be nice to have all 18 solenoids like new again. I’m so tired of dealing with air leaks, I replaced the parking brake valve and one of the tank drain valves that were leaking last week as well. -
HWH leveling question
granvillebarker replied to MSHappyCampers's topic in Chassis, Handling, Tires & Brakes
I just finished replacing all the o-rings in all three of the six packs this week and it appears I have a new leak on the rear left. It has to be a piston seal leaking, as I see no leaks on any of the solenoids. I guess it’s time to build a test fixture to test each solenoid, argh! I’ve thought about putting the rear six packs under the bed, I bet the hoses and wires would be long enough, the space is almost directly above them. -
HWH leveling question
granvillebarker replied to MSHappyCampers's topic in Chassis, Handling, Tires & Brakes
This makes me want to relocate the 6-packs in a storage bay too. -
Wax Valve
granvillebarker replied to granvillebarker's topic in Engine, Transmission, Engine Cooling, & Hydraulics
Yes, that’s a hydraulic needle valve to make the fan spin a little for the dash a/c. -
Wax Valve
granvillebarker replied to granvillebarker's topic in Engine, Transmission, Engine Cooling, & Hydraulics
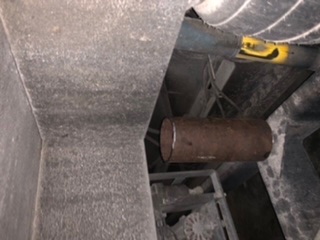
Here’s a pic of the valve mounted and connected. The coach is so much quieter now without the fan on full blast, I can’t wait to see the fuel savings! I honestly have no idea how many years / miles it’s been running full speed. I am sure there are a lot of others in the same boat and didn’t know it either.


-
I’ve been working through my punch list since getting back from our last trip. Today it’s the wax valve. I’ve seen several threads about this, I went with the one from the UK, and installed it into the top pipe of the radiator instead of the thermostat tube. This was pretty easy, in my opinion, just a few nuts and hose clamps then a little welding and putting it all back together. Putting it back in took less than 30 minutes at lunch. I will add the coolant back tonight and hook up the hydraulic lines. Having it in the radiator pipe make the lines not need to move far at all. — Granville Barker


-
HWH air leveling solenoids
granvillebarker replied to granvillebarker's topic in Compressed Air Systems
Mikes write up is excellent, so I’ll let you look at it for details. I’ll say the back is much more difficult than the front, the drive axel is right in the way. I’m attaching pictures of the two rear solenoid packs before I started, then with two coils removed, and the last photo are the six without the coils after being cleaned, new o-rings and re-installation. In that first photo, you can still see the plastic partially wrapping the HWH wires from the factory. I think Monaco wrapped them like that to keep the wire labels from getting covered in paint when the chassis was painted. The wires going to each coil and the pressure switch have tags next to the plugs saying where they connect, Iike “RS / Travel”, “RS Raise”, etc... — Granville Barker 05 Dynasty


-
HWH air leveling solenoids
granvillebarker replied to granvillebarker's topic in Compressed Air Systems
It’s probably the coil on the raise solenoid, I’ll take pics of the ones tomorrow and post them. I’ve had two coils die recently, my dead ones were open If tested with an ohm meter, so I’m testing all of them while I’m under there. -
We are home for a few weeks and I recently read a thread that listed all three o-rings for the HWH leveling solenoids. I decided to be pro-active and replace all the o-rings instead of just the leaky ones. I did the front six today and five of the six on the plunger side crumbled in my hands when I removed them. Only two currently showed leaks. i will do the back 12 tomorrow and all of them again next time any of them leak. I also tested all the coils with an ohm meter, they should be around 14-15 ohms when good. My coach had all the HWH wires wrapped with a plastic bag when I got it new, so I rewrapped all that as well today. — Granville Barker 05 Dynasty
-
I decided to update the radio and replace one of the cig lighter plugs with usb. The plastic was cracking around the screws, and the radio hole wasn’t right, so I decided to cut a new panel out. I had some coreplast used for sign substrate laying around so I cut the new panel out of it. I covered it with carbon fiber wrap and it looks pretty good.

-
No power to HWH control board or panel
granvillebarker replied to tomfreeman56's topic in Compressed Air Systems
Is the unit in the top of the bay getting power? Are any LED’s on? I think the ignition may need to be on. -
No power to HWH control board or panel
granvillebarker replied to tomfreeman56's topic in Compressed Air Systems
Did the fuse blow again after you replaced it? Does yours have a reset switch and warning light in the front run bay? -
The ones for the rear are 6” and 10”, the ones for the front could have been 12”, but I made them 10”, so I could get away with carrying fewer around. The front is a bit of a pain, as you have to place them where they won’t pinch a cable or hose and that’s tricky. With these lengths my coach is level when sitting on them, and has lots of ground clearance. I know you can change rear air bags with these lengths, luckily I haven’t had to change a front one yet, but they should work for that. — Granville Barker 05 Dynasty


-
I talked to the guys at Micro-air today that make the EasyTouch RV Thermostat. He said it will support the Duo-Therm protocol by December, and I should wait for that instead of replacing the upper control boards. — Granville Barker 05 Dynasty
-
I’m a little late here, but I found that these vents work the best going down the road for the price, at a little under $5.00 each. If you compare them to the ones at most of the box stores, the ones in the stores don’t have a spring in there, and eventually the rubber gets old and they sag and leak. After much research and searching I found them at www.cpesupply.com My 05 Dynasty has 5 of these guys hidden in places, 3 under sinks, one behind the washer/dryer, and one behind one of the kitchen cabinets for the shower. Don’t forget to add a little Teflon tape to the threads when you replace them. When I have odors now, I’m pretty sure it’s a empty trap.


