


hex_nut
-
Posts
144 -
Joined
-
Last visited
Content Type
Forums
Downloads
Articles
Gallery
Blogs
Events
Store
Everything posted by hex_nut
-
What are these called, latch and switch?
hex_nut replied to On_the_road's topic in Body, Awning, Roof, Slides, & Steps
The latches Monaco used under the bays are commonly referred to as toggle latches. I have not found the exact ones they used, but here is a link to similar on ebay: https://www.ebay.com/itm/304592579668?hash=item46eb21ec54:g:cDUAAOSwa59i8kQf&amdata=enc%3AAQAHAAAAoABLBXj6%2FCE3FU1YecpSHmIdAUlP5eJgE6V9G3ClMpCY%2F74w1G0dDmCedPgNjNYTj5wAIim32UsbgWuLlS4%2Bnujlh7vE5UwJHnv9FUzW9vzj2Bjt0rPZwfWnKcyev9oYpmwteeliy2fI8d2TTVGPRJPA5f6pES95FeqhwOzKJAQkTFERo3HAPX8O1Ou6ayj98LjgFzPdYJvRnl2%2FraHvWLE%3D|tkp%3ABk9SR464sLf4YA -
Intellitec Multiplex Clear Plastic Button Panel Availability
hex_nut replied to hex_nut's topic in Electrical Systems
Thanks Frank. They do not have any of the 4 button or 10 button panels that I need, but they have the 6 button panels and I think I can adapt them if I cannot find the others. Richard -
I have been trying to find some replacement clear plastic replacement buttons for the Intellitec MUX switches. The square panel parts seem to be available for the newer systems, but the curved panel parts seem nowhere to be found. I have been gluing some of mine back together for years with limited success. Is there a source for these that I am not aware of? I looked thru the parts list, but did not find them. If they are no longer available, has anyone attempted to 3D print some? Thanks for enlightening me. Richard
-
John I would suspect that your biggest issues are failing ballasts in your florescent lights. When the ballasts age and start to fail electronically, they create a strong electromagnetic field. The field they create impacts all the other wiring in the area (it is called cross-talk). In my old '98 Tradewinds, my kitchen light ballast would randomly turn my furnace on (or off) just because the wires were close together in the ceiling. I replaced those light panels with LED's. No more problems. Richard
-
Body End (Belt) Side molding end cap Sources
hex_nut replied to a topic in Body, Awning, Roof, Slides, & Steps
I also could not find replacements for these. And, I was not happy with the original material which rusted badly. I fabricated new ones out of thin aluminum material (I used some scrap pieces of old storm door frames). They worked nicely and are holding paint just fine. Richard p.s. I also remember that DR4Film (Richard) was looking for these and I think he found them. He may chime in. -
Blue Ox Broken Tow Bar bolt questions
hex_nut replied to 4rickyg's topic in General Motorhome Discussion
Here is a picture of the other style of lock nut attachment on the yoke bolt. In the picture, there is a square nut (item #2) that goes in the 2" square tube and a lock nut (item #1) to secure it in place. I "assume" the system was redesigned to be more secure with the 2 lock bolts coming from the sides. Richard
-
Blue Ox Broken Tow Bar bolt questions
hex_nut replied to 4rickyg's topic in General Motorhome Discussion
Attached is a picture of the yoke attachment for that version of tow bar. The two small bolts that go in from the sides are locking bolts that secure the nut of the main bolt that holds the yoke into the square channel. The locking mechanism was redesigned by Blueox at some time during the manufacturing process. That is why you see some of them with the 2 small bolts and some of them without. This is an old unit and probably past its usable life. Before I would spend much time and money repairing this, I would instead be looking to replace it with a new one. Richard
-
Getting a big spark when you reconnect the batteries is normal because of the electronics in the Magnum inverter. From what I can tell from your pictures, your connections look correct as long as those new batteries are 6 volt. A guy last week replaced his 6 volt batteries with 12 volt batteries, but connected them the same as the original 6 volt batteries. He created a 24 volt battery bank. No telling how much of his electronics he fried. Richard
-
The only Sam's clubs that carry the 6 volt AGM batteries seem to be East of the Mississippi. I do not know why the others do not carry them. I have had good luck with VMAX tanks. Their XTR6-235 has been a very good battery for us. My dad uses them in his golf cart, I put a set in my Mother's power scooter and I bought a set for my motorhome. A set of 4 set me back about $1350 (shipped to my door). I am sure they are not as good quality as the Trojan's, but they were significantly less expensive. I would never go back to flooded batteries since I also do not have a sliding battery tray and servicing the flooded batteries was a real problem. And, I hated the corrosion problems the flooded batteries created. Good luck with your search. Richard
-
If you are on shore power and your fridge is set for electric power source it should energize the 110 volt heating element. The overload you were receiving on the little inverter was likely when the heater energized. If you have a volt meter, you can check the power wires to the heating element to insure your are getting 110 to 130 volts alternating current (110 is minimum, 130 is maximum). The heating element is installed inside that rectangular tower just above your inverter in your picture. Even if it is working correctly, it will take a number of hours o get that fridge cool again. That is just the way absorption fridges are, that is why many people (me included) remove them and install compressor fridges. (As well as to remove the fire potential.) Richard
-
There is no compressor. That is an absorption fridge. It must boil the chemical media either with a propane flame or a 110 volt heating element. That 400 watt inverter is much too small. It would take at least 3 times that much and would kill your batteries in a short period of time. Absorption fridges requires either shore power or propane for heat source. They are just not practical on battery power. Richard
-
I "assume" you have the VIP steering wheel system with the wiper controls on the steering wheel. Common failure points are the "clock spring" mechanism inside the steering wheel that maintains electrical connection when turning the steering wheel and possibly a failed connection on the connector at the base of the steering wheel. I would clean the contacts on the connector first since that is cheapest and easiest. Also do a search on clock spring repairs on the VIP system. If you are not a member of BAC (Beaver Ambassadors Club), I would recommend that you join and search their forum for VIP system issues. Richard
-
Gary The activation pin is not a numbered item in that description. It is between items 4 and 5 in that diagram. It is easiest to see in the picture posted by Steve P.. It is a small round barrel shaped post (just over 1/4 inch in diameter) that fits into the half-moon detente in the lock tab. I will repost Steve's picture here so you can see the wear on the mechanism. I simply glued the valve cap over the post in place of the bushing. When I have the opportunity, I will replace the valve cap with a proper bushing, but the valve cap certainly got me out of a jam and provided a temporary fix. Richard

-
I thought I would add my two cents to this topic if you are far from home and need a quick fix to the entry door opening issue. Last winter in South Texas my entry door became more and more difficult to open. I remembered the temporary fix of adding a bushing to the activation pin to compensate for the years of wear in the mechanism. However, I was far from anywhere with no way to locate or fabricate a bushing. I scrounged through all my "stuff" to find something that would work. Finally picked up a chrome metal valve cover cap. And, guess what, it was the right size. I cleaned the activation pin and JBWelded that valve cover cap onto the door handle activation pin. It has worked flawlessly since. Just something to keep in mind if you are in that position. Richard
-
I have found that it is quite common to have campgrounds with failed neutral/ground bond. Unlike residential wiring that has the neutral/ground bond at the residence, RV code requires the neutral/ground bond to be external to the RV wiring for safety reasons. (Mike Sokol has written a number articles about this situation if you wish to do some research on his blog.) This situation also arises if you attempt to power from a small generator that does not have a neutral/ground bond. I have created a 50 amp adapter plug that is neutral/ground bonded that I use in these situations. It satisfies the code requirements that the bond be external to the RV. Mike has a description of how to build one for your own use if you wish. It would be nice if all campgrounds kept their power pedestals maintained and properly functioning, but we all know that just is not happening. It is more frustrating when you report the issue to campground management and they act like it is your fault (They say "well no one else is having any problems"). Only RVs with sophisticated energy management systems will catch this issue. Richard
-
Condensation between windows
hex_nut replied to BradHend's topic in Body, Awning, Roof, Slides, & Steps
I did one myself, what a pain. After that, I scheduled an appointment with RVFogDR in Searcy, Arkansas and had my others done. Richard -
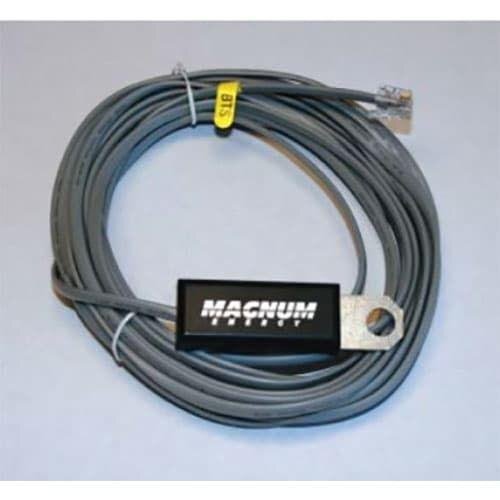
Richard That is good news. That means you do not have an ME-AGS-S. You have the old standard mechanical predecessor to the ME-AGS-N. It was simply called the ME-AGS before the "-S" and "-N" designations came about. Are there two data cables inserted in those ports in your AGS? Mine are simply labeled "AGS", with one being a green label and the other being a purple label. The green labeled cable goes back to the inverter/charger. If you have both data cables, you are good to go. The purple one actually goes to a temp sensor somewhere in your coach that triggers the temperature start for the generator to run the air conditioners when you leave pets in the coach in the Summer. I have no idea where they would have put it in your coach (snowflakes). Mine is actually in the cabinet above the driver. As to your other question, different types of batteries have different charging parameters depending on temperature. Flooded lead acid batteries produce a lot of heat while charging, so temperature sensors become important. Lithium batteries also have temperature tolerance issues, AGM's not so much. The temp sensors often get eaten up with acid from flooded batteries, or are simply disconnected and not reinstalled when people are not paying attention. I switched to AGM batteries because I did not like the corrosion issues of flooded batteries (golf cart batteries). My Magnum temperature sensor had been destroyed by the acid from the flooded batteries, so I ordered a new one (see picture). If you cannot find yours, I would recommend getting a new one since it will make your battery charging more efficient. Richard
-
Richard You may wish to carefully check your current AGS to determine if it is actually the ME-AGS-S, or if it is just the OLD version of the ME-AGS. I cannot comprehend that Monaco would actually install an AGS-S in a Motorhome since that version is specifically designed for installations that do not have an inverter. So, I am left a bit puzzled. Please let all of us know what you find out. Thanks. Richard
-
Richard The old version that I had (see attached picture) had two RJ11 communication cables just like the AGS-N, making it an easy upgrade. If the one you want to replace only has one RJ11 port, than you will evidently have to run another comm cable and things will not be as easy as it was for some of the rest of us. It sounds like you may wish to make a call to Magnum tech support with the specifics of your current installation and what would be required to upgrade to the AGS-N. Good luck. Richard

-
Richard After I installed the new AGS-N, it started just fine with the "test" mode. However, it would not start correctly from a "low voltage" condition. I grabbed my digital VOM and started testing continuity on the sense wire to the AGS-N. That's when I found that the sense wire was attached to the bus bar for the starting battery and not the bus bar for the house batteries. Thanks to Monaco's nicely labeled wires, it was just a situation of moving the wire from a post on one bus bar to a post on the other bus bar right next it. My AGS is installed in the FRB along with all the battery bus bar connections. I have since read on many Monaco forums, that it was common in those years to have the AGS sense wire connected to the wrong battery bank from the factory. People who did little boondocking never noticed that the AGS did not function correctly. Just to satisfy my own curiosity, I looked up current prices for the AGS-N and Remote monitor. Needless to say, sticker shock set in. I had paid about $100 for the pair. Current prices look to be about $500. Oh well! It is still a worthwhile upgrade. I "assume" your original still has the mechanical potentiometers on the AGS, and they were a nuisance to use. And, mine was in the FRB, so I had to go outside and open the bay door to make any changes. What a nuisance. Richard
-
Richard When I bought my 2006 Beaver a few years ago, I found the original AGS to be inconvenient. Nicely enough, I found the ME-ARC and ME-AGS-N new-old-stock on E-BAY very inexpensive. It was pretty much a plug-and-play upgrade other than having to learn where all the menus are and how to set things up. I doubt that you can find them cheaply anymore, but I do consider them to be a worthwhile upgrade if you want an easy to use AGS. Richard p.s. Be sure to check which battery bank your AGS is sensing. Mine was wired to sense the engine starting batteries (DUH). Sure had to change that.
-
As George commented above, I simply went to Home Depot and bought the Watts whole house pressure regulator with 3/4 inch pipe threads in and out. Of course I had to purchase adapters to go to hose connections and a gauge to set the pressure. At the time (years ago) the whole thing came to about $25. It has worked flawlessly for many years. If I had it to do today, I would probably just buy the one from Amazon that already has the gauge and hose fittings built in and is much, much cheaper. Richard p.s. I really, really hate those in-line pressure regulators that do nothing other than restrict the water flow (especially the plastic ones).
-
Looking for Pre-Purchase Inspector in Bushnell, FL Area
hex_nut replied to AlanC2's topic in General Motorhome Discussion
Escapees organization has a park in Bushnell with many RVers in the area. You might call them and see who they recommend. Richard -
I "assume" your Sig has air brakes. With that consideration, I would definitely recommend one of the systems that is fired directly off of the coach air brake system. I have the Roadmaster Brakemaster system and it out performs anything else I have used. I have used the NSA Ready Brake and a couple of the electrically activated systems. Nothing has worked as well with true proportional braking than having an air cylinder directly pushing on the toads brake pedal. Richard
-
Tommy I have exactly the same problem, and I have done the same things you have to no avail. I will be monitoring this thread to see if anyone has a knowledgeable solution. It is very frustrating since the drip comes down at the front door when I am parked and level. Richard


