


trailmug
-
Posts
121 -
Joined
-
Last visited
-
Days Won
2
Content Type
Forums
Downloads
Articles
Gallery
Blogs
Events
Store
Everything posted by trailmug
-
2000 Dynasty Dash AC Compressor: not kicking on
trailmug replied to Mary & Glenn's topic in AC, Heating, and Cooling
Should be something the size of a tall boy beer, between the condenser and the TxV (should be the other end of the hose you pictured earlier). See if NAPA still has the MEI/AirSource catalog.. it has a ton of truck A/C parts. That's where I got mine. http://www.meicorporation.com/pdfs/Driers09.pdf The switch is MEI 1512 or 1513, depending on the threads. If you're ordering parts, grab some oil, too.. The Sanden oil is MEI 8248 (presuming you have a Sanden compressor.. that info was in my coach info sheet). It's recommended to put a couple oz in the receiver if you replace it. -
2000 Dynasty Dash AC Compressor: not kicking on
trailmug replied to Mary & Glenn's topic in AC, Heating, and Cooling
Re: the receiver/dryer.. there's a cake of desiccant in it that absorbs any residual moisture. If the system lost its charge it would have taken on air/humidity and saturated the desiccant. You might be able to bake the old one in the oven in a pinch. If you do get a new one, you can cut open the old one to get an idea of the condition of the system. This is what mine looked like. Gross. That oil should be clear. I hear you re: the new skill.. I ended up with a recovery machine, cylinder, and an EPA license out of working on our coach (charging liquid from a 30lb cylinder is way, way easier). 😛
-
2000 Dynasty Dash AC Compressor: not kicking on
trailmug replied to Mary & Glenn's topic in AC, Heating, and Cooling
Switch is probably just stuck.. they're not very reliable, especially if the system has had dirt or sludge in it. You'll want a new receiver/drier for sure if the system was flat for a long time. Did it have any pressure in it before you charged? Moisture in the system will cause the TxV to freeze and restrict the system, or form acids that will eat a hole in the evaporator; the presence of air causes high pressure spikes. No need to pull the system down to replace the switch as mentioned, but you'd obviously need to empty it to replace the receiver, which would find you needing a vaccum pump. My switch is in an R134a system but the fitting Monaco used is for R12. Pressures are the same, but double check the threads. -
Solved: 2009 Dynasty Aquahot not turning on
trailmug replied to ken.knutson100's topic in AC, Heating, and Cooling
Check the gap on the electrodes with the gap tool that's bolted to the side of the motor? -
That one looks like an electric pusher which is probably wired up to run anytime the clutch is engaged. Mine willl even do it engine off, key on.
-
Yeah, looks like a shutoff valve like you'd use to pump down a residential unit.. never seen one on a mobile application. Any chance of enough hose slack to turn it 90 degrees and hook it straight up to the condenser? The O rings on those kids of fittings are the primary seal.. if it's replaceable, it definitely sounds like a promising place to start.
-
Just did this. My coach is wired such that the generator starts from house batteries. I tried wiring up the gen start switch to trigger the Big Boy and still had starting issues. Onan manual for my 12.5 recommends 2/0 cable for the run length where Monaco has 2ga coming from the FRB. I riveted a battery tray to the front of the thing and rigged up some cables and an isolator. Highly recommend. Edit: measure the genset pos/neg terminals when cranking.. the ECM cuts out starting when the voltage sags to 6V, which mine definitely did. 40 something feet of 4/0 plus 20 something feet of 2ga plus the ground cable and frame plus crappy crimp joints.. there's a LOT of loss from the rear of the coach to the front. Cranking power I measured at 300A.

-
Yep, these are called tactile switches. Bet you can find a suitable replacement here: https://www.digikey.com/en/products/filter/tactile-switches/197?s=N4IgjCBcpgzADFUBjKAzAhgGwM4FMAaEAeygG0QAWeANhtpAF0iAHAFyhAGU2AnASwB2AcxABfIgCZYAViQhUkTLkIlyIWAA4wdRMxDtOPASPFixQA
-
Rear AC compressor turns on then off quickly
trailmug replied to Steven P's topic in AC, Heating, and Cooling
What's the tstat set to? I suppose on the wilder end of the spectrum, the dish box could be injecting RF noise onto the sensor wire. -
Rear AC compressor turns on then off quickly
trailmug replied to Steven P's topic in AC, Heating, and Cooling
Got it. Ours short cycled on two occasions.. the Intellitec load shedding device kept tripping erroneously. That circuit is shared with the washer, which only ever seems to draw about 4A, so I bridged the hot wires with an Alumiconn. The circuit might be overcommited by the nameplates, but in practice it stays under 20A and works fine. On the second occasion, the indoor temperature sensor wire broke, and made an intermittent connection. I noticed it mainly happened when the slide was extended, so I measured the temp sensor connector resistance while my wife moved the slide. The value jumped around, so I ran a new temp sensor wire, this time not in the slide. I don't think this one's your issue, since your fan continues to run, unless you're not using the auto fan setting. Frost sensor issue would cause the compressor to cut out and the fan to go to high speed, so probably not that, unless you had the fan set to high already. Dirty RJ-11 couplers in the ceiling cause some weird stuff as previously mentioned. I'm not sure if these have a high pressure cutout switch inline with the compressor.. I don't think they do. -
Rear AC compressor turns on then off quickly
trailmug replied to Steven P's topic in AC, Heating, and Cooling
Not doing it on generator is interesting.. shore power is usually lower voltage than what you get off of the genset (longer cables, shared use, crappy pedestal maintenance, etc). Maybe there is some high resistance in the mix somewhere. Measuring line voltage at the unit while it's doing it could be informative. -
Any fancy considerations for burping the AH engine coolant loop? I thought I remembered a forum member having difficulty with engine heat transfer after having the hoses replaced.
-
I round up to the nearest weight and use that inflation pressure; if you're properly filling em cold (in the morning before the sun hits), you're gonna have more air in the tire as you use the coach throughout the day. Our 120PSI steer tires get up to 140+ on a summer drive through foothills.
-
Dash A/C pretending it is a heater.
trailmug replied to Testdepth's topic in AC, Heating, and Cooling
Yeah the thermostatic cycling is normal in a TXV system with low load. Since there's no cycling switch, there's a frost sensor on the evap that cuts out to prevent icing. -
Dash A/C pretending it is a heater.
trailmug replied to Testdepth's topic in AC, Heating, and Cooling
The Schraders seal well enough for you to get the caps on, but they aren't the primary seal.. if the caps are missing, you'll want some replacements. My low side pressure is pretty low with a full charge (20psig) owing to the long suction line. It's difficult to charge these guys without recovering and weighing it in. If you have no capacity label, based on my experiences, I'd fill to 18F subcooling and then recover a pound. Capacities seem to vary a significant amount system to system. -
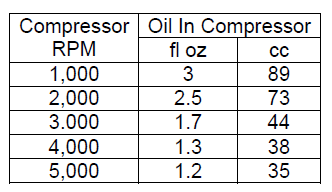
I second the recommendation to take the compressor apart. If it overheated due to lost charge or lack of oil, the center ball would probably be welded to the gear. Sanden has a public service manual to help diagnose common failure modes. Knowing what I know now, I'd measure the amount of oil in the old compressor, and also cut open the old receiver/dryer and see how much crud is in it. https://www.sanden.com/objects/Failure_Analysis_Web.pdf The binary switch which servess to turn the compressor off on high head and lockout the compressor on lost charge, in my experience, isn't that reliable. I evacuated my system and it still took some time for the switch to open (reasonably new switch). Especially since there's no sensor on the low side, if the charge is lost while the compressor is running, the system won't shut down until the high side goes <28 psig by which point everything would be pretty well cooked. Was there still a charge in the system when you went to replace? Looking at the factory oil charge on the 4420, it comes with 6.75oz. My 4475 came with 10 oz and I still ended up adding 4 oz to it to get the crankcase level right (long suction lines tend to pool oil and these guys come filled for semi tractors). I wonder on the original replacement how much oil was installed. PAG 100 is the right stuff (Sanden calls it SP-15). Edit: the Sanden procedure for measuring oil was updated to run the compressor at a given RPM and then make sure a given quantity of oil was in the system by taking it off and draining it into a container. Mine is not easy to install, so I used the legacy dipstick. I flushed ours with 2 gal of naptha and it took about 2 hrs with a single stage vacuum pump to reach a stable vacuum (700 microns). Replaced the condenser out of paranoia, but when I cut the old one open, it looked just fine.
-
Thanks, it looks exactly like https://www.steelerubber.com/flexible-edge-trim-70-4104-244
-
Our coach has rubber seals/gutters installed roughly between the Girard awnings and the roof, which appears to be intended to direct water to run off at given points (I think to avoid pooling near the awning perforations). I need to reconfigure one of these because it's channeling water over an aftermarket wheelchair door and exceeding that door's ability to seal. Any idea where I can find some of this stuff? It appears to be neoprene. I tried Pelland and a few other Google searches, but I'm not sure exactly what it's called. Thanks for any input, Rob

-
I've had this issue before on a temperature sensor that was mounted on a slide-out. Monaco used solid thermostat wire which broke and became intermittent when bent back and forth a bunch of times. Diagnosed by putting an ohm meter on the sensor wires at the roof and moving the slide.
-
The suction line from the evaporator to compressor is probably most reasonably field assembled because of the length, twist, turns, etc (Monaco appears to have assembled the entire system with a manual crimper). I suppose you could feed a wire/string down the old hose to measure the length (and measure the fitting "clock" angle) and have one made if you think you can get right angle fittings through all of the passages. All of the OE-validated refrigerant lines these days are reduced-diameter and engineered as a system. I tried to source Parker's series 1A fittings to field-assemble 285 hose for a validated solution (what I would REALLY want for this), but was unable to find them. I presume what you're working with is #10 standard diameter barrier hose. If find yourself needing to crimp onto an old standard diameter hose, I highly recommend Gates fittings.. NAPA can order them. I have had multiple MEI Airsource-sourced fittings leak after assembly. I have a MasterCool manual crimper you are welcome to borrow, if you like. For any of the shorter runs, like from the receiver-dryer to the evaporator, I recommend taking the old hose to a Parker Store and letting them fab one for you with a hydraulic press. It's expensive ($100) but worth knowing you have a good hose assembly. My leak was at the high side service port, and I ultimately had Parker make me a 2 ft hose terminated with MIO fitting, and then crimped my own service port / o-ring fitting onto the old #8 hose (1 manual crimp vs 3). Fortunately, they had the special "Tube-O" fitting needed to connect to the compressor head. A refrigerant sniffer is not very expensive and works better than UV dye in my experience. Got to be careful with UV dye as mineral oil-based dye will wreck a PAG-lubricated system (I believe this happened to my coach). I've been through nearly a full system replacement, except for the evaporator and the long lines, if you're looking for someone who cares way too much about dash air and thinks he knows everything (I actually ended up with an EPA 609 cert out of this). Take care and good luck with the repair, Rob Edit: If the system has gone completely flat, you would ideally replace the PAG oil in the compressor crankcase, as it is hydrophilic, and you definitely want a new receiver/dryer and another couple oz of oil to go in that, and new HNBR O-rings to go on anything you take off.


-
Front AC unit and Splendide not getting power
trailmug replied to Mick Jane P's topic in AC, Heating, and Cooling
The Intellitek load shedding device is a double-throw relay, hard to imagine it killing power to two devices at once, although possible. Probably more likely one A/C leg is down as Larry suggested. Try cycling the main 50A breaker.. sometimes they can open without moving the handle. I'd be interested to know if the problem remains while running the generator. If not, check your shore power at the pedestal (240V between the left and right blades), 120V Left-to-center and right-to-center, cycle its breaker, and then the wiring to the transfer switch. -
I decided not to stick with Michelin after the sidewall cracking on ours got so bad that clover mites were crawling into them. The tires were 6yrs old, and we drive regularly (about 10k miles/yr). Toyo M144 has been working well for us for the last two years, and were about half the cost ($500 ea).
-
Stupid question.. are these mounting bolts accessible from outside or inside the coach?
-
Sure, but nasty inrush from starting electric motors are what that product is intended to reduce.. more of an academic thought.
-
Wonder if it could help with my issue of the transfer switch failing to select the genset with A/Cs on. Operator error, but still. 🙂


