


pwhittle
-
Posts
341 -
Joined
-
Last visited
-
Days Won
11
Content Type
Forums
Downloads
Articles
Gallery
Blogs
Events
Store
Everything posted by pwhittle
-
Kit to replace Intec mirror mounted side cameras
pwhittle replied to pwhittle's topic in Audio, Video, & Electronics
Hi Paul, I expect we can take care of both. Perhaps Velvac has some documentation on their mirrors. Can you try to find that? And welcome to Monacoers! Sorry you had to come here with a problem. Paul -
Kit to replace Intec mirror mounted side cameras
pwhittle replied to pwhittle's topic in Audio, Video, & Electronics
Hi Paul, Can you take a picture of the new 4-pin plug? I have some of the 3-pin plug in the generator bay and if you have the pin outs of the new connector and can work out the connector, I can likely make a cable to suit. Paul -
Flush Mounted Progressive Industries Remote - 2006 Dip
pwhittle replied to Scotty Hutto's topic in Mods & Upgrades
Looks great Scotty! -
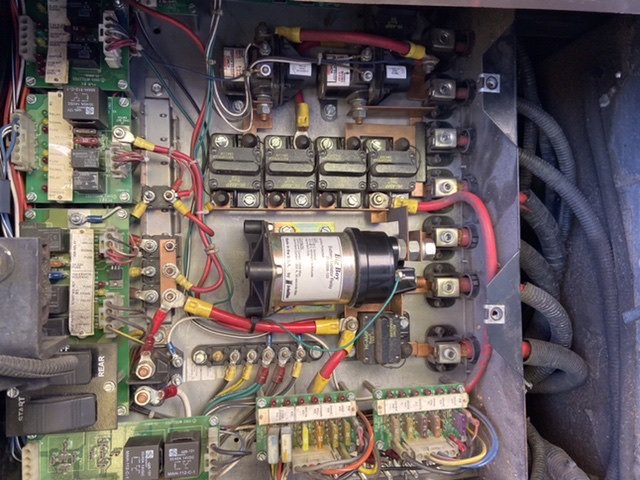
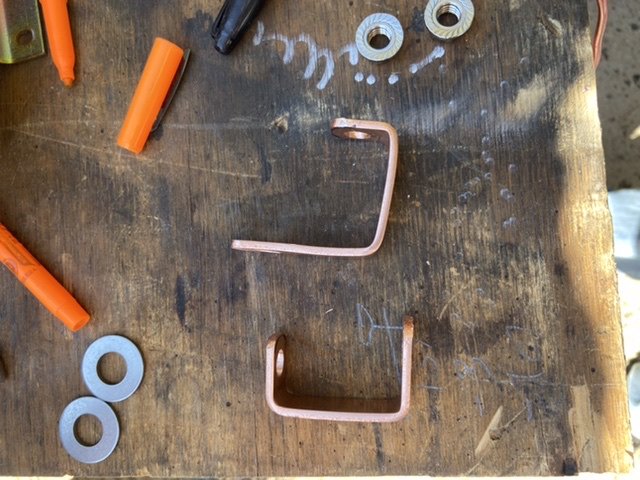
I had previously posted this as a reply in another thread, but I have referred people to it and wanted to have an easier way for them to locate it. I have also made some updates to the original post here. I cleaned my Big Boy once, and when it needed it a second time, I replaced it (and the BIRD circuitry) with a Blue Sea ML-ACR. A much better solution that costs less than a Big Boy Relay. The ML-ACR is a simple device that does one thing: connects or disconnects the house and chassis batteries. It has automatic voltage sensing so that if either bank is being charged and the other is not, then it will connect the two banks of batteries. The features I like about it are - Will charge both sets of batteries from the alternator or output from the inverter/charger - Auto mode as well as manual off and manual combine override via the remote switch or on the relay itself - LED status indicator on the remote switch that replaces the Battery Boost switch in the dash/side panel - Takes no current to hold it in either position, so does not run hot - Sealed from the elements - Senses charging on either bank of batteries to combine in Auto mode - Has high current ratings - Continuous Rating 500A - Intermittent Rating 700A (5 Mins) - Cranking Rating 1450A (30 seconds) - Lifetime warranty I had previously replaced the diode based isolator and battery boost relay with the ML-ACR on our 1994 Signature and it has operated without issue since 2014. I have helped Vanwill replace the same setup on his 2000 Dynasty and another friend on his 2002 Signature. In those cases the ML-ACR replaces the isolator, the Battery Boost Relay, and the Lambert style or Trik-l-Amp or Trik-l-Start solution to keep both sets of batteries charged. For our coach the ML-ACR replaces the Big Boy relay and renders the circuitry that drives the Big Boy unnecessary. I left the circuitry in place and just taped up the outputs that would go to the Big Boy. Mechanically the ML-ACR is a similar size to the Big Boy relay and we used 1/8”x3/4” copper bar to connect the ML-ACR to the existing wiring. We also ran a pair of wires from the RRB to the dash for the remote switch. We could have run one wire and reused the existing wire from the Batt Boost switch. The remote switch also needs fused power and ground which we picked up from the FRB. Notes: - It is possible to build relays or some other logic to drive one of the Isolation inputs on the ML-ACR to disconnect the batteries when you have two charging sources such as when the generator is powering the Inverter/charger and the engine alternator is providing charge as well. I chose not to do that, and just use the switch on the dash to disconnect the two battery banks to let the alternator charge the chassis batteries and the inverter/charger to charge the house batteries - If you have different type of batteries, say house AGM and chassis lead acid, you should consider not leaving both banks connected all the time when you are on shore power where the Inverter/charger is configured for the AGM batteries as that could overcharge the chassis lead acid batteries and damage them. This may have contributed to the death of our original chassis house batteries, but they were in the coach when we bought it, so they may have just lived out their useful lives. When I replaced them, I installed Duracell AGM's to get close to the Lifeline AGM House batteries in charging voltages. You can always connect the banks the day before you are ready to travel or if you see the charge is down on the chassis batteries. - This is not a suitable solution when the house batteries are Lithium. Lithium batteries require a different charging profile than AGM or Lead Acid so you would preferably install a DC-DC converter to keep both sides charged when there is a single charging source instead of connecting both banks Manufacturer link: ML-ACR Automatic Charging Relay with Manual Control - 12V DC 500A - Blue Sea Systems Amazon link: Amazon.com : Blue Sea Systems ML-ACR 12V DC 500A Automatic Charging Relay with Manual Control, Beige : Boating Battery Switches : Sports & Outdoors Paul


-
Hi Woody, I have not had a chance to look at that setup yet. Paul
-
Kit to replace Intec mirror mounted side cameras
pwhittle replied to pwhittle's topic in Audio, Video, & Electronics
The side cameras are BOYO VTK230HD’s. Our original rear camera is working quite well for now so I a done any research into a replacement. Paul -
On our 2005 Signature the rubber seal that Monaco used between the slide topper housings and the window awnings and the body was allowing water behind the housing and onto the top the of the slide. Sometimes the water would make its way into the floor. Monaco used an inappropriate rubber seal and not the one recommended by Girard. The seal Monaco used was the same as the seal that runs around the top of the windshield to channel water away. There is no good way to create a watertight seal with the body or the top of the slide topper, especially after it hardens and shrinks a little with age. I replaced ours with this: Trim-Lok P-Shaped Rubber Seal – EPDM Foam Rubber Seal with HT (General Acrylic) Pressure Sensitive Adhesive – Door & Window Weather Seal for Homes, Cars, & Boats – .5” Height, 1.25” Width, 100’ Length Learn more: https://www.amazon.com/dp/B01CJRIT4A It lays with the flat part horizontal and the round part against the body. I added 3/8” VHB to the top of the P to stick to the body. 3M - 4611 0.375" x 36yd VHB Tape 4611, 0.375 in width x 36 yd length, 1 roll Learn more: https://www.amazon.com/dp/B00N3U6742 I also used the following adhesion promoters. For the VHB to the painted body surface: 3M 111 Clear Tape Primer - Liquid Bottle - For Use With 3M VHB Tape - 58147 [PRICE is per BOTTLE] Learn more: https://www.amazon.com/dp/B00745Z8BK For the VHB to the rubber 3M Tape Primer 94 1/2 Pint 8oz For Vinyl Di-Noc Learn more: https://www.amazon.com/dp/B005LDG7HQ Finally sealed the edges with this: RV Trailer Camper Sealants Proflex Rv Flexible Sealant Clear 10 Oz. Geocel Quantity 4 Learn more: https://www.amazon.com/dp/B00YBG3PR4 I use masking tape to get a clean line on the clear sealant. Details on 3m adhesion promoters here: https://multimedia.3m.com/mws/media/66019O/vhbtm-tape-surface-preparation-technical-bulletin.pdf Finished installation. I fixed this back in GA’s Dixie Dust season when pollen covers everything. Paul

- 1 reply
-
- 2
-

-
Kit to replace Intec mirror mounted side cameras
pwhittle replied to pwhittle's topic in Audio, Video, & Electronics
I also added a 10” dashboard monitor to the Aladdin and placed it in my field of vision when driving. This is a great improvement over the 5” display down in the center dash. The Aladdin supports 4 RCA monitor outputs with video and sound from the rear camera when it is selected and only two are used as standard: the one in the dash, and the one in the bedroom. I plugged this into the third output. I plan to remove the original Sony display in the center dash but it also supplies 8V power for the rear camera so I am leaving it in till I put together a wiring harness/power converter to provide the power for the new monitor and the 8V power for the rear camera for a plug and play install. Paul


-
2005 Exec won't go into TRAVEL mode
pwhittle replied to waterskier_1's topic in Chassis, Handling, Tires & Brakes
I have seen mine drop out of travel mode after a few minutes. I tracked it down to the low pressure switches in one of the 6 packs. On mine it was the drive axle. you can bypass this by unplugging the failed low pressure switches at the six pack. Paul -
Woody, I can help you with the mirror cameras. Please see this post. Paul
-
SeaLand Magnum Opus Toilet - Wanted
pwhittle replied to pwhittle's topic in For Sale: Parts, Components, & Accessories
HI Ed, I sent you an email with the details. Paul -
Hi Ken, I am glad that we got your issue resolved. I had one other user that reported an issue and the software update resolved his too. The update was to extend the timer on the operation of the flapper before it determined it was an error. Apart from that update, it is still the same software and if you are not seeing intermittent issues, there is no need to do anything with your controller. Paul
-
Kit to replace Intec mirror mounted side cameras
pwhittle replied to pwhittle's topic in Audio, Video, & Electronics
I have two kits assembled and ready to ship if anyone would like to update their Intec side cameras to color and get rid of the head knockers hanging down from their mirrors. Paul -
2005 Monaco Signature Castle IV 45' tag air pressure gauges
pwhittle replied to Megame's topic in Compressed Air Systems
In 2005 the instrument panel was made by Faria Beene. I have confirmed these work with our 2005 Signature. https://www.ebay.com/itm/233346308381 https://www.ebay.com/itm/312773539212 Paul -
Kit to replace Intec mirror mounted side cameras
pwhittle replied to pwhittle's topic in Audio, Video, & Electronics
I was able to use the same technique Kevin used to install the camera kit without removing the mirrors from the coach. One hand in the generator bay feeding/pulling the smaller of the two cables and the other pulling/feeding the cable on the camera. Thanks for the inspiration Kevin! Paul -
Kit to replace Intec mirror mounted side cameras
pwhittle replied to pwhittle's topic in Audio, Video, & Electronics
Great to hear you were able to install them without removing the mirrors Kevin. It may be a good idea to put tape on the connector to make it less likely to separate in the middle of the mirror arm. If that happens (like it did to me) they you will be taking the mirror off. Thanks for for posting your feedback! The next two kits will likely be shipping tomorrow. I expect to receive some more cameras and put some more kits together in two weeks. Paul -
Kit to replace Intec mirror mounted side cameras
pwhittle replied to pwhittle's topic in Audio, Video, & Electronics
The cameras are wide angle and the headlights are in the field of vision. The glare from the headlights mean they are not very good after dark. Paul -
Kit to replace Intec mirror mounted side cameras
pwhittle replied to pwhittle's topic in Audio, Video, & Electronics
Hi George, Pictures are good now. Thanks for letting me know. I've sent you a PM with my phone number. Please give me a call when convenient. Paul -
Monaco replaced the turn signals mounted in the Velvac mirrors with a mount for an Intec camera that integrates with the Aladdin camera system. I found mine to be headknockers as I was always running into them I have updated mine to use a color lip mount camera which is a great improvement over the Intec B&W camera. I was asked by some other owners to put together a plug and play kit, so I have updated mine and have built a couple of kits for other people. The adapters are 3D printed using ABS (the same material that Lego's are made from). The wiring harness is plug and play so you do not need to join any wires, just unplug the old camera and plug in the new camera. Removing the existing camera mount can be a chore. I find it easier to remove the mirrors from the coach and do this on the bench. It is held in with a small hex screw that is turning a cam inside the housing. Turn the screw counterclockwise till you feel a stop as the cam moves to the position where you can remove the camera mount from the arm. With the Intec camera on, it is tough to get to the screw head as the Intec camera stops you from getting a straight angle to the screw head. You can install them without removing the mirrors from the coach, but I find it easier to remove them to get to the camera mounts and if you have the mirrors off, you can pull come of the camera cable through to make it easier to get the new camera cables into the arm. The new cameras look like this. The p icture on the Aladdin screen look like this. The kit s look like this. One is shown in my Intec camera mount which is not part of the kit. I will be making these available for purchase at $250 per two camera kit, including the camera's. Of course there will be a special Monacoer's price. Just send me a private message through this forum. I am not yet carrying a stock of these kits, but should have a couple kits available within two weeks. If you have an interest, let me know so that I can get some more parts on order and get your kits built. Paul


-
On my controller the relay that drives the Cruise On Output signal stopped working. I wired a fused jumper around it. Whenever it is on , the a cruise is on. Not set or active, but able to be set. VIp prices the Smartwheel controllers fairly, so I will replace it some time. Paul
-
Hi Neil, @vanwill52 has one that has never been installed available. It is located near Pinehurst, NC.


-
SeaLand Magnum Opus Toilet - Wanted
pwhittle replied to pwhittle's topic in For Sale: Parts, Components, & Accessories
Hi Doug, I sent you the details by a Private Message on this forum. Paul -
I checked fuel pressure on one last weekend and it was over 200PSI. Adjusted it back to 145PsI, but the coil was not sparking. Paul
-
SeaLand Magnum Opus Toilet - Wanted
pwhittle replied to pwhittle's topic in For Sale: Parts, Components, & Accessories
Hi Brad, Mine failed in a similar way to what you describe. The board thinks it is turning the motor on, but I it does not. The error code is that it never changes the limit switch it expects to change if the motor actually came on. Count the flashes on the one that is flashing and that will tell you what the error code is. Paul -
Flasher for making the changing to LED turn signal lights
pwhittle replied to Nosmo179's topic in Electrical Systems
I faced this on our 1994 Signature. The solution was to install a bridge rectifier in the wiring for each LEDbulb. The two inputs can be GND or 12V, when one is GND and the other Is 12V the output -ve will be GND and the output +ve will be 12V These ones are rated at 2A, which is plenty for a single marker LED. (Pack of 20 Pieces) Chanzon 2W10 Bridge Rectifier Diode 2A 1000V WOB Single Phase, Full Wave 2 Amp 1000 Volt Electronic Silicon Diodes https://www.amazon.com/dp/B079KD43YG Paul


