


Moonwink
-
Posts
78 -
Joined
-
Last visited
Content Type
Forums
Downloads
Articles
Gallery
Blogs
Events
Store
Everything posted by Moonwink
-
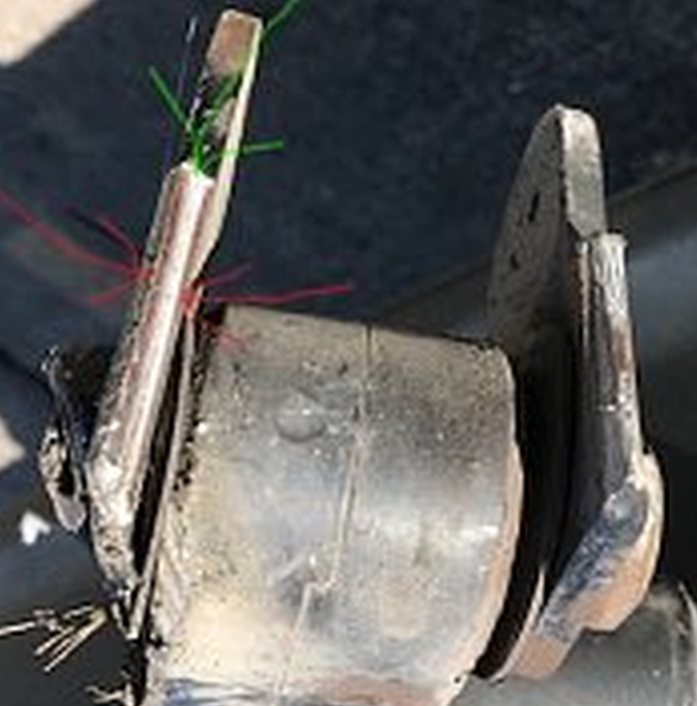
Borrowing a picture from the IRV2 post, we see more detail here showing how the towbar "broke". The welds didn't fail after all. Clearly, the tabs were torn off the 2" receiver bar. Many of the images below are borrowed from IRV2. The person that posted this image thinks he can see rust (the red arrows) where the metal had been cracked before it sheared off (the green arrows). I've blown up his picture to try to see what he says is there. Comparing the picture above with the one below, it's hard for me to recognize them as the same towbar. The arrows show the point were the metal was sheared off. The weld to the 2" box held. To me, this indicates there was tremendous stress put on that metal that caused it to shear off like it did. It appears both sides were sheared off cleanly. The question that still remains is which direction did that stress come from? The metal isn't twisted like would happen if it was twisted sideways. It's more like the stress came straight up or down on the point of failure. It appears later models of the Avail towbars had the pieces that sheared off welded to the side of the 2" box instead of forming a U and welding it to the end of the 2" box. I suspect baking up without disconnecting had something to do with this failure.


-
Now that the towbar has been identified, here's a picture of what it looked like: It's a shame those welds broke. The more I look at the critical parts, that single bolt allowing the bar to twist looks like the weak link in the chain. I think I like the design of the Aventa II I have better but it still relies on the strength of a single 3/4" bolt to pull the towed. Seems like 10,000 lbs is a lot of weight for one 3/4" grade 5 bolt.


-
I still don't understand exactly which part failed looking at the picture. DR4Film posted the picture upside down. The original image was laying on it's left side (see the car tire in the background). Below is an exploded view of an Aventa II Tow Bar. The image above doesn't look like it was the Aventa model though. I suspect the two plates were welded to the 2 inch box going into the receiver and that was the point of failure. #7 in the view below was not welded but the picture appears to be #11 with the two plates on either side. The two arms connect to #11.


-
Did Monaco only make one model in 1986? How can anyone give advice to the OP without know what chassis he needs help with? The way I see it, more information is needed to give a good answer here.
-
Sorry to hear replacing the solenoid didn't fix your problem. I found these cleaning instructions for the solenoid and figured I might as well post them for others reading this post.

-
On my Trek, I have to "wake up" the horn every day when I'm driving or else it doesn't work when I need it. After hitting the horn button 5 or 10 times, it starts working and will give a blast every time I press the button. I suspect the solenoid valve is sticking. If I knew where it was, I'd try getting a little silicone in it's air line before replacing it. I guess moisture builds up inside the air line over the years and causes problems.
-
Anybody know what this is and what it does?
Moonwink replied to Chad A's topic in Audio, Video, & Electronics
https://www.nwrvsupply.com/product/78564.html Mito Corp. RGB/NTSC Controller Product Code: 78564 Price: $14.95 10 available for immediate delivery -
Windshield Curtain
Moonwink replied to jim.hamblin's topic in For Sale: Parts, Components, & Accessories
Pictures of what you replaced those curtains with would be a great help. It might give us some ideas to work with. -
Cubic mini wood burning stove.
Moonwink replied to Military RVer's topic in For Sale: Parts, Components, & Accessories
https://www.amazon.com/Wood-Heat-Safety-Jay-Shelton/dp/0882661604/ -
From the Norcold 1200 RV refrigerator Owner's Manual: LEVELING: CAUTION: The refrigerator is made to operate within 3° off level side-to-side and 6° off level front-to-back (as looking at the front of the refrigerator). Operating it at more than these limits can cause damage to the cooling system and create a risk of personal injury or property damage. Make sure the vehicle is level before you operate the refrigerator. Trying to use the refrigerator outside of these limits is asking for trouble. The boiler will overheat which may cause a fire and the solution could crystalize which is not reversible. Treat your absorption refrigerator with care and it will give you many years of service. Abuse it and pay the consequences.
-
From the SafeTAlert 65 Series User's Manual (the LP detector maybe similar): End of Life Signal - The Sensor has a 5 Year Service Life All 65 Series models include an End of Life (EOL) Signal indicating the sensor has reached the end of its service life and you must replace the alarm. The signal is the LED flashing RED RED GREEN GREEN with a beep every 25-30 seconds. The EOL Signal may be reset by pushing TEST / RESET button on the alarm. This will reset the EOL Signal for a period of 72 hours (3 days) for a total of up to 30 days. After 30 days the signal cannot be reset and the alarm must be replaced. DO NOT DISCONNECT THE ALARM UNTIL YOU HAVE A REPLACEMENT ALARM AVAILABLE TO INSTALL. CO - 65_Series.pdf Propane - 40_Series.pdf From https://www.mtiindustries.com/faq/ the Safe-T-Alert website FAQ: How often should safety Alarms be replaced on a RV? Replace your Propane and CO Alarms that are over 5 years old. Only install Propane and CO Alarms that are UL listed for Recreational Vehicle Use. Some CO Alarms or their replaceable CO sensors may have a shorter service life. Check the manufacturer’s owner’s manual for replacement information. Replace your Smoke & Fire Alarms that are over 10 years old. Trouble-shooting Guide Green Operational LED Off 1. Bad Wire Connection 2. Reversed Wiring 3. Main Power Off 4. Missing Or Blown Fuse 5. Contact Customer Service 1-800-383-0269 No Sound When Testing Or No Red Led When Testing Contact Customer Service 1-800-383-0269 Locked In Alarm Contact Customer Service Malfunction Alarm Led Red/Green & Beeps Every 15 Seconds Battery Voltage Is Good And It Will Not Reset To Normal Operation 1. Check Battery Voltage 2. Contact Customer Service 1-800-383-0269 END OF LIFE ALARM Push Reset Button To Reset For 3 Days – Replace Within 30 Days. What do the visual and audible signals on the Alarm mean? Normal Audible Signal: None Visual Signal: Steady Green CO Alarm Audible Signal: 4 “Beeps” / 5 Seconds Off Visual Signal: Steady Red Propane Alarm Audible Signal: Constant Visual Signal: Flashing Red Alarm Malfunction Audible Signal: “Beep” Every 25 Seconds Visual Signal: Alternating Red / Green END OF LIFE SIGNAL Audible Signal: “Beep” Every 25-30 Seconds Visual Signal: Red Red Green Green Flashing Additionally, if the LED lights are blinking on an Alarm that is wired into your RV, your RV battery may be run down. Charge your unit if this occurs.
-
The latest dryer outlets require 4 wires (a neutral and a ground plus to hot wires). They are still 30amp/240volts.
-
Walter, I think that's about the time they changed over to LEDs. I bought a couple in an RV Supply store behind Love's in Quartzsite about then and had to look at the fine print on the package to make sure I was getting the LED lamps. Resistor Sizing: The link I shared above has all the information needed size a resistor for LEDs and any voltage you want to use them with. It's not that critical. If the LED is too bright, use a stronger resistor. If it's not bright enough, use a smaller resistor.
-
I never got rid of my out of balance vibrations until I had the tires balanced on "Hunter's GSP9700 Road Force Vibration Control System" https://www.hunter.com/wheel-balancers/road-force-elite/#vision In one operation, it tests for out of balance and out of round conditions. I first discovered this machine while reading Ford's TSB covering the 2000 F-53 chassis explaining how to solve out of balance conditions. I believe it's the finest wheel balancer on the market. You can find who has one near you using this website: https://www.hunter.com/find-equipment/? (disclaimer: I have no connection to the company)
-
Just buy new indicator LEDs: https://www.amazon.com/JR-Products-12725-Indicator-Switch/dp/B002UC14SS/
-
I found the second Wheelmaster braided extension for the inner dual on the other side of my Trek has failed. That's two for two. I will never buy another braided extension. The tire was completely flat and off the rim - just like the other side when I found it. At least I found it sitting in my driveway 3 weeks before heading out for the winter. I had to take both tires off and squirt the wheel with a soapy solution and fiddle with it after taking the valve core out to get it seal on the wheel again. It's holding 95psi with no signs of any other leak. I see Wheelmaster also sells a 2 ply rubber hose extension. I think it will last longer than the tubing with a braided jacket. I wanted to stay with a name brand extension so I ordered the Wheelmaster 8006. It's the two longer hoses for the inside duals. While I had the wheels off, I slipped the Centramatic balancers on to give them another try. The only trouble with them on, it's even harder to get at the inner valve stem - which is the only reason I ordered extensions again. Without them, I'll have to take the outer wheel off to adjust the pressure in the inner tire.
-
I wanted quality so I bought the genuine "WheelMaster" brand braided extensions. Shortly after buying a TPMS, I left on a short trip and noticed the TPMS in alarm. I'd had trouble with all the sensors reporting and didn't pay any attention. When I got ready to return home, I checked the tires and found the inside dual completely flat and off the rim. The braid is only cosmetic. There's a plastic tube inside them. The tube had a hole in it allowing all the air to escape. I called road service and was told it would take an hour and half to get to me. While waiting, I had nothing better to do, so I took off the wheel liner in preparation. Then I figured, why not use my jacks to raise the tires off the ground? That went well, there was plenty of time so why not see if my 18v Ryobi impact would loosen the lugs? Bingo! The lugs were off (I've got an F53 Ford chassis). Still had a long wait before road service would show. I pulled the outer tire off and coaxed inner one off too. I got out my air compressor and tired several times to reseat the bead without any luck. I found a way to support the assembly by the wheel and used some spray soap to successfully get the tire to take air. By the time I got the tires back on and lugs tight. The job was done so I called road service back and cancelled the call. I looked around the campground and saw their truck just showing up. Oh well. I haven't bought anymore extenders but if I do, they'll be the plain rubber hose style so I can tell if there's any deterioration. I've been sticking my hand through the hole in the rim to put air in and screw on the TPMS sensor for the inner dual.
-
After troubleshooting my Winegard GM1518 Carryout via emails with tech support for over a week and trying to get them to sell me parts, I finally (after many months) shipped it to them. The flat rate on diagnosis was $70 after shipping it prepaid. The replaced a couple small components on the circuit board (I didn't know anyone had the skill to find and replace defective parts on a circuit board these days) and shipped it back to me with a new set of cables. The new cable set cost a lot more than cost to repair (on top of the cost for diagnosis). It's been working great since then. I went to my local UPS store to buy a 24" cube box to ship it to them. UPS wanted about $75 for shipping. I sent it through the USPS for $27. It came back in a box 23" x 23" x 17" high - the cost to ship that was only $17 (I saved that box - just in case). Burlington Iowa isn't that far from me - just up the river a few hours drive but I was told shipments had to arrive by common carrier. Yes, they will not sell parts like circuit boards but at least they don't scrap their circuit boards and sell you new ones when just a couple of components fail.
-
https://www.bbb.org/us/mo/cottleville/profile/auto-service-contract-companies/carshield-0734-310030296 This is a link to the Better Business Bureau's listing for Car Shield. You may have seen their advertising on TV with celebrities raving about how great their coverage is and how much can be saved by having you car covered with a policy. The BBB gives Car Shield an "F" rating due to the number of complaints they've received. Putting your money into a savings account instead of premiums will probably be the best way to use your money.
-
Another vote here for Greg Wilson's lights. I bought the motion light to start with but found it didn't stay on long enough for me. I swapped it out for "Bug-Guard" model and love it. Turn it on once and you'll get a white light, cycle power and it comes on yellow. Cycle the power again to get it back to white light. It's the brightest porch light I've seen for RVs. Buy it on Greg's website https://rvledlites.com/product/bg520b-a/# and get the best price except for in the big tent at Quartzsite - if he's there next January. I highly recommend Greg's products. I've also found the cheap ($5.50) solar motion lights found in the auto section of Dollar General to be great stick-ons for wherever you want a little light at night. They glow all night and brighten up when you walk by for 15-20 seconds. Be careful not to buy the same light in the "as seen on TV" section where it sells for over $13. I put one of these on the back so I don't trip over the towbar and one over the wet compartment in case I have to empty a tank after dark. They come with 3-M type double face tape making them easy to apply. I put them on windows whenever possible. They can be popped back off without too much effort but I've never had one come off without tugging on it. I keep a couple extra handy. The best price on the rechargeable battery I could find was $2.50 so at $5.50 for this light I figure it's a bargain.
-
I have no idea what the situation at the border is but just across it from Yuma in Algodones Mexico, there's a shop called "Navarros Shop" that I've heard many good comments about. USA phone numbers: (928)329-8906/(928)328-1114. They have good reviews and great prices from what I've heard. No website but you can find them on FB: https://www.facebook.com/navarrosdobyshop A couple of Trek owners had their MHs painted there and highly recommend them.
-
My a/c allowed water to pour in when parked at the curb with the passenger side lower than the driver's side. I replaced the gasket and found a telephone wire (like the ones going into a house) wrapped around the bolts. When I bought the new gasket, I was told to compress it to half of its uncompressed height.
-
What triggers one's posts being monitored?
-
Have a look on this webpage to see if you can match it: https://www.spoilerlights.com/sl-category/rv-third-brake-lights/ Here's the one you need and just your luck, it's out of stock. Maybe the part number will help though: https://www.spoilerlights.com/spoilerlights/monaco-dynasty-third-brake-light-type-sl-84013/ or take a look at this eBay listing (only $18.99 and free shipping for the next 10 hours) The drawback is it is shipped from China. https://www.ebay.com/itm/23LED-Rear-High-Third-3rd-Brake-Stop-Light-Lamp-For-Camper-Bus-Truck-Trailer-RV/352818905410
-
I just bought 4 of the Trojan T-105 batteries myself. I had 4 Interstate GC-2 batteries before that and purchased the Flow Rite system for them because I don't have a battery tray and it would be extremely difficult to figure out what the level is in the batteries in the back of the compartment. The Interstate batteries were completely full when I pulled them out. I found the best price on Amazon for the pump and caps for 4 batteries. I'm happy with the system and would buy it again although I think it's over priced but it does work. This is a picture of my battery compartment with the 6 year old Interstate batteries. I'd need an extension mirror to see the level in those back cells but I can't figure out how I'd ever fill them to the correct level.


